


AmailPlus is Aveshost's business email hosting service. Use it to create professional email addresses with your own domain, such as [email protected]. Follow the steps below to choose a plan, connect a domain and complete your order.
Before you start: Decide how many mailboxes you need and whether you want to register a new domain, keep an existing domain with its current registrar, or transfer it to Aveshost. Have your Aveshost account details and preferred payment method ready.
The screenshots use example domain details. Prices, available billing periods and plan features may change; confirm the details shown in your cart before paying. Click any screenshot to enlarge it.
1. Open Aveshost's Business Email page
- Visit www.aveshost.com.
- Click Email in the main navigation to open the Business Email page.
- Click Explore plans, or scroll down to the plans.
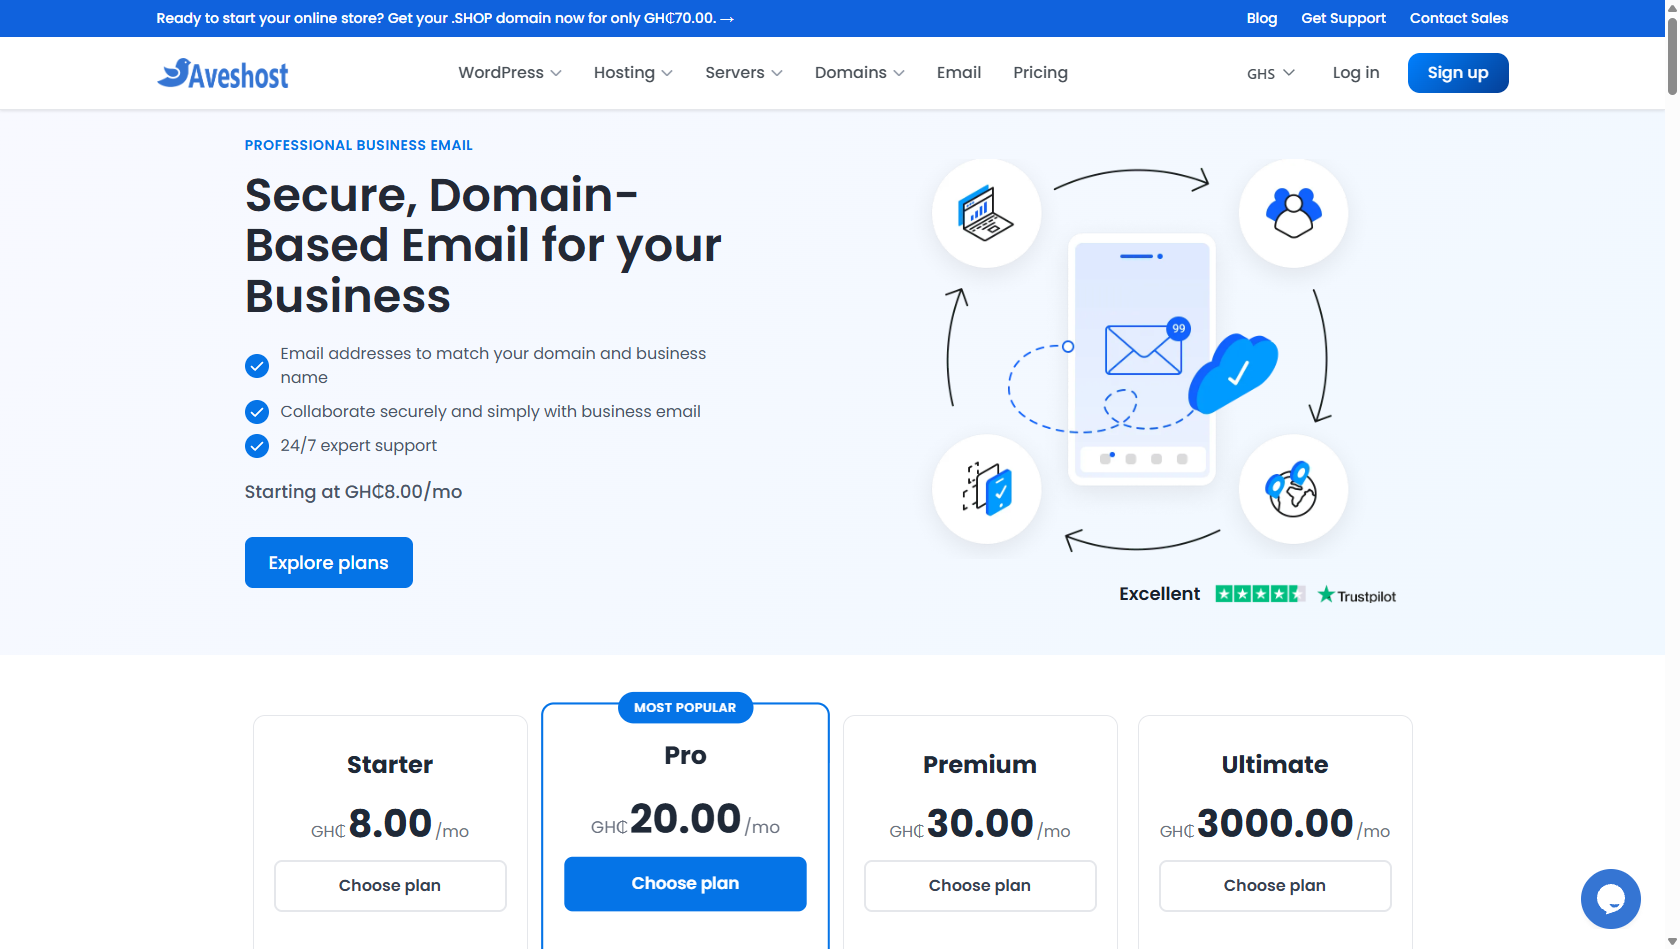
Open Email, then select Explore plans.
2. Choose your AmailPlus plan
Compare the number of email accounts, mailbox storage and other features included with each plan. Click Choose plan beneath the package that suits your business.
- Starter: 1 email account.
- Pro: 4 email accounts.
- Premium: 7 email accounts.
- Ultimate: 300 email accounts.
In this example, we select Pro, which appears in the order form as AmailPlus Pro and includes four mailboxes. The mailbox allowance is part of the plan, so choose the package with the number of accounts you need. For a different requirement, use Get a Custom Quote on the Business Email page.
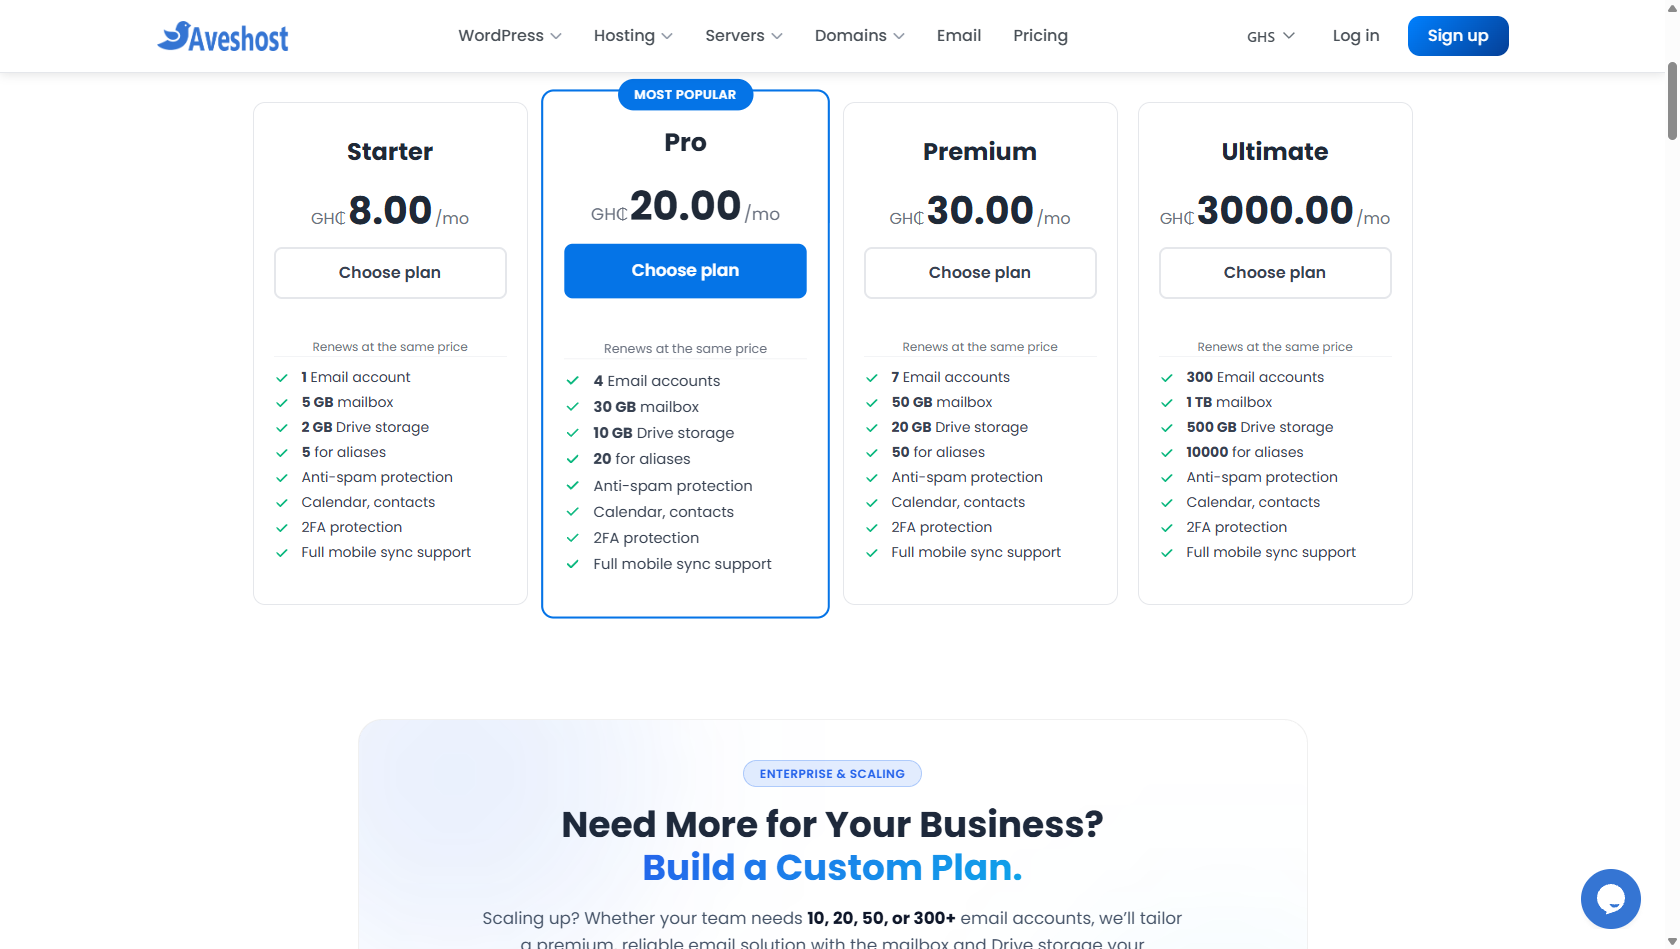
Compare the included email accounts and click Choose plan.
3. Choose a domain name
The order form opens the Choose a Domain... page. Check that the selected product is the AmailPlus plan you intended to buy. Next, choose one of the following options.
Option A: Register a new domain
- Select Register a New Domain.
- Enter the name you want to register and select the extension, such as .com.
- Click Check to look up availability.
- If your preferred domain is available, select it and follow the on-screen prompts to add it to your order. If it is unavailable, try another name or extension.
- Review the registration period, domain price and any optional extras offered before continuing.
Note: Domain registration is a separate item from email hosting. Check the cart for its cost. If privacy protection or other domain extras are offered, review their purpose and price before selecting them.
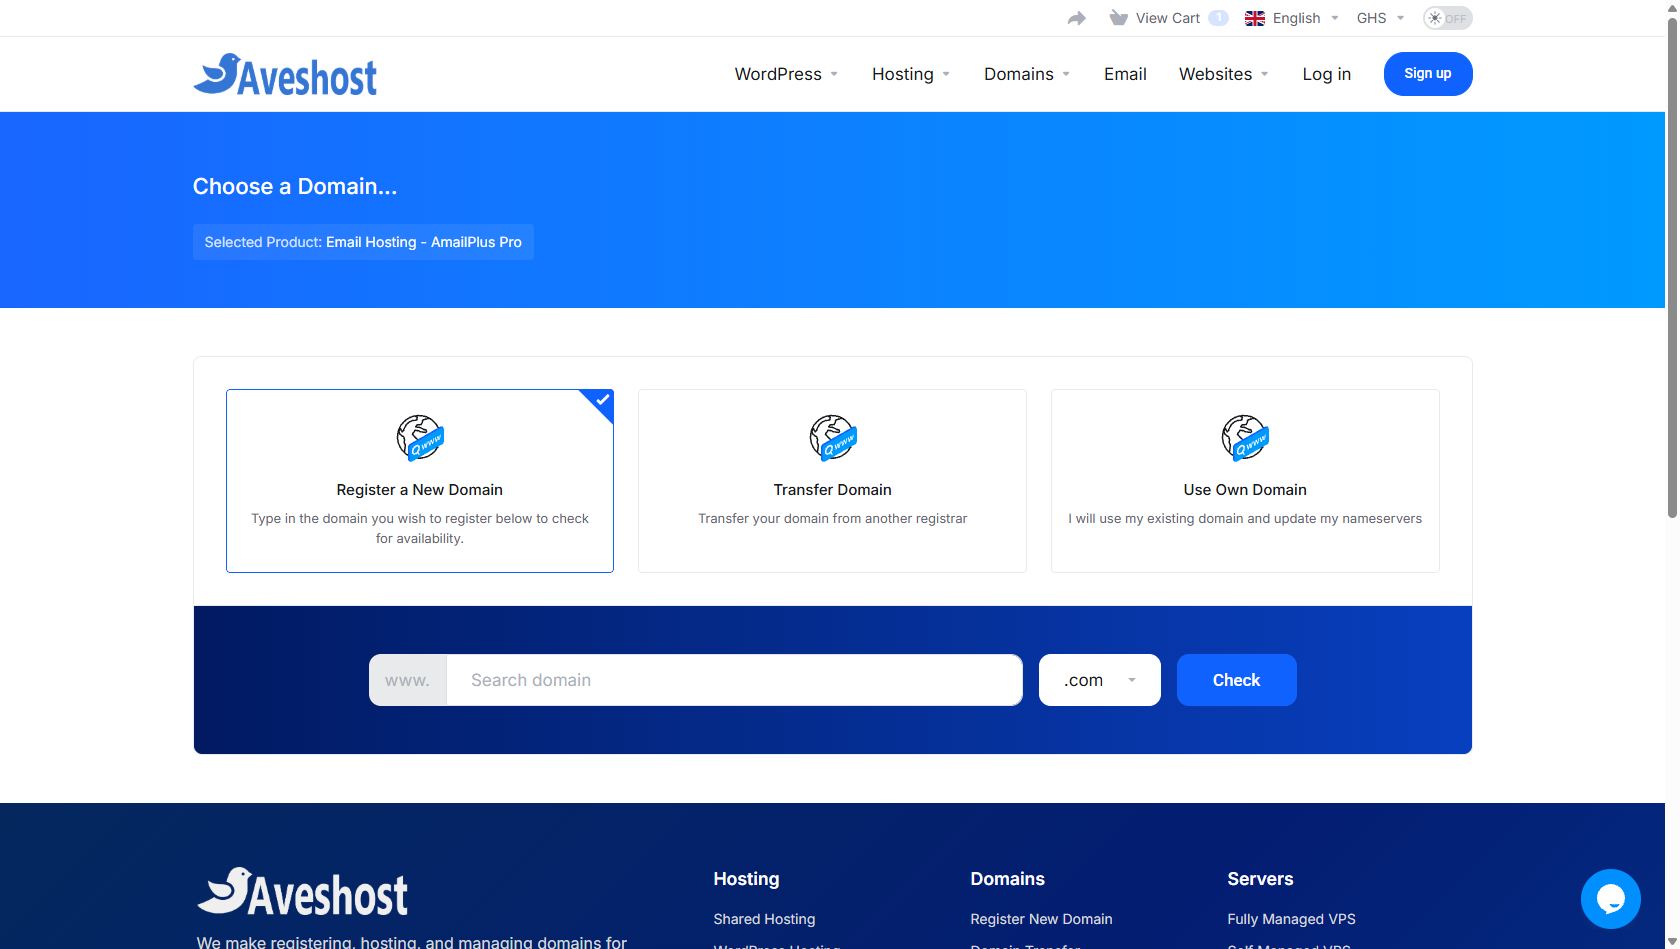
Select Register a New Domain and check your preferred name.
Option B: Use an existing domain
If you already own a domain, choose whether to keep its registration with your current provider or transfer it to Aveshost.
Keep the domain with its current provider
- Select Use Own Domain.
- Enter the domain name and its extension in the separate fields. For example, enter domain in the first field and com in the second.
- Click Use to continue.
Enter only the domain, without https://, www. or an email address. The example domain.com is a placeholder; use a domain you own.
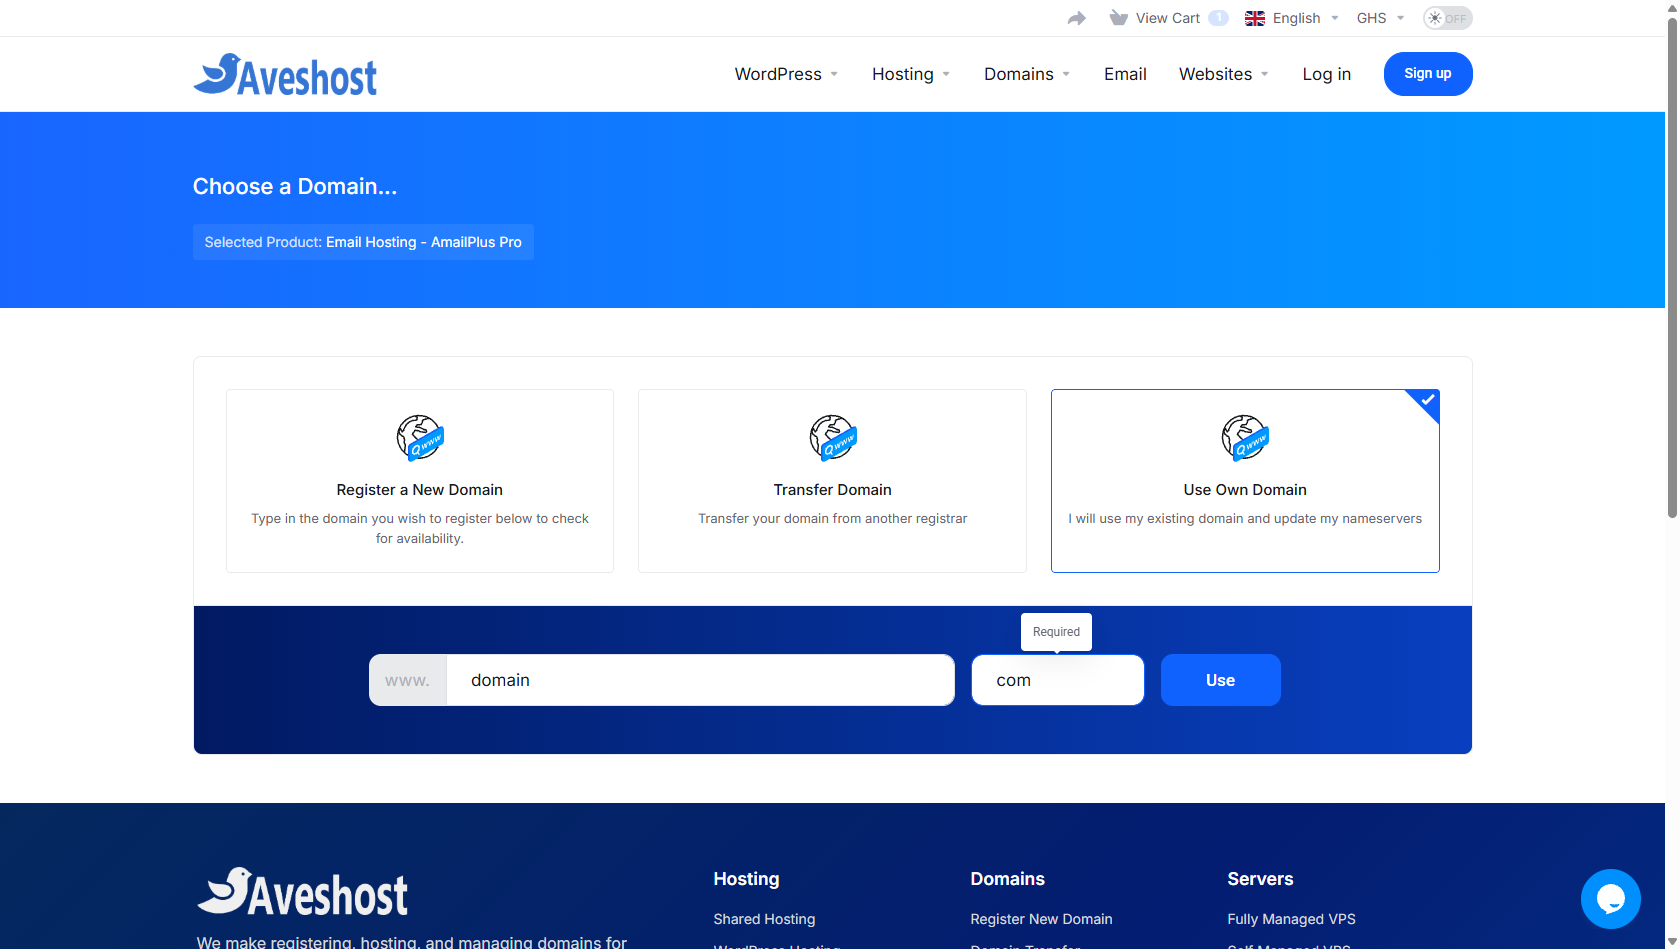
Use Own Domain lets you order email hosting for a domain you already own.
DNS setup: Keeping your domain with another registrar requires the correct DNS configuration for AmailPlus. Follow the DNS instructions supplied by Aveshost after activation. If you already have a website or email service on the domain, contact Aveshost support before changing nameservers or mail records so the change can be planned correctly.
Transfer the domain to Aveshost
- Select Transfer Domain.
- Enter your domain name, choose its extension and click Transfer.
- Follow the eligibility checks and prompts. Where required, unlock the domain with your current registrar and obtain its transfer authorisation code (also called an EPP code).
- Provide the code when requested and review the transfer charges and domain details before continuing.
A domain transfer moves the registration to Aveshost. It does not automatically migrate existing email messages. Ask support for migration guidance if you are moving an existing mailbox service.
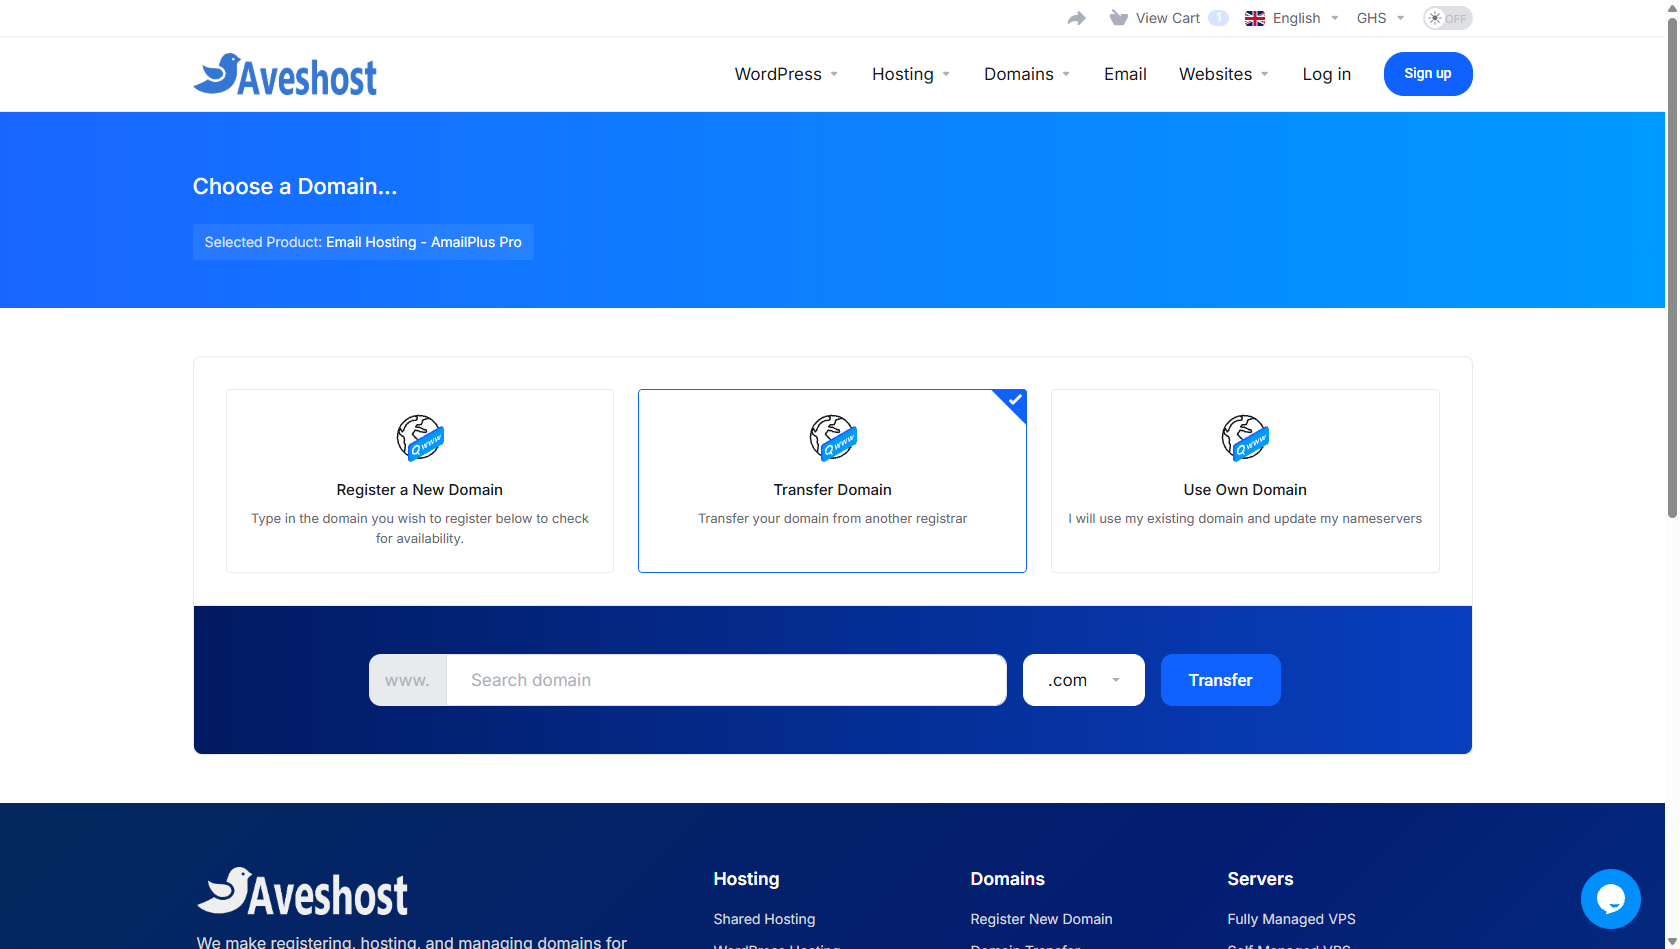
Choose Transfer Domain if you also want Aveshost to manage the registration.
4. Configure your plan and billing cycle
- On the Configure page, review the plan name and included mailboxes.
- Under Choose Billing Cycle, select the billing period you prefer from the options available.
- Check the domain and amount under Configuration Summary.
- Click Continue to proceed to checkout.
Example: The screenshot shows AmailPlus Pro with four mailboxes and quarterly billing. At the price displayed, GH₵20 per month is billed as GH₵60 for three months. Always check the total due today, rather than assuming the advertised monthly equivalent is the immediate charge.
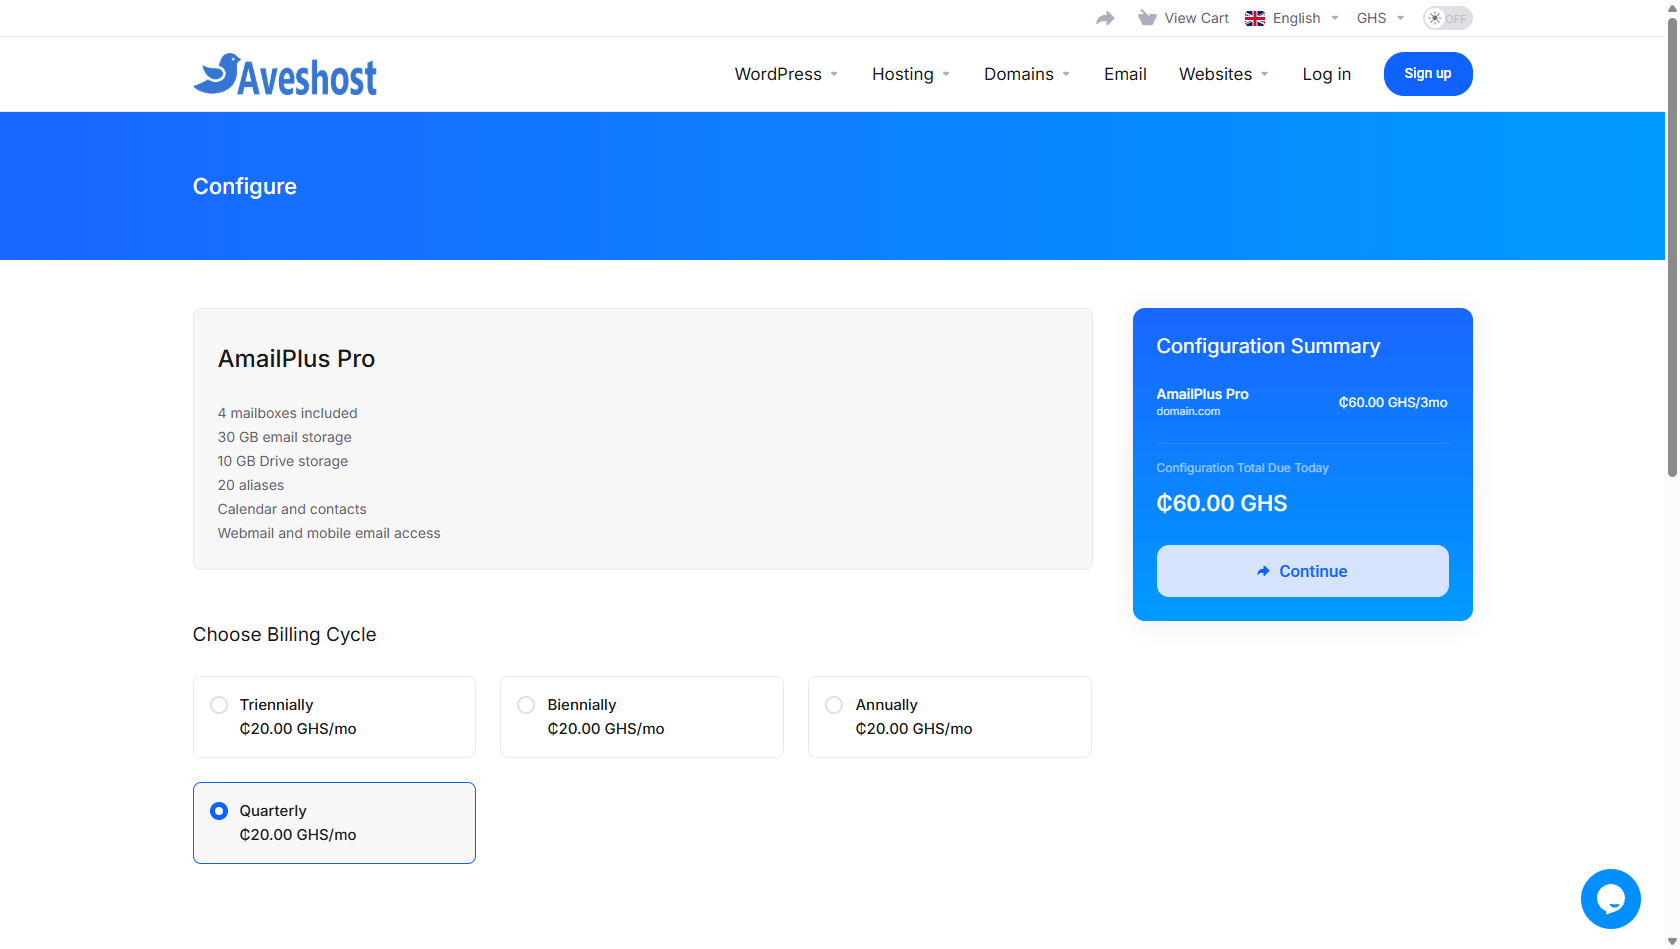
Confirm the plan, billing cycle, domain and total before continuing.
5. Review your order and enter billing details
- On Review & Checkout, check your AmailPlus plan, domain and billing cycle.
- Use the edit option if you need to change the selection. Remove any unwanted items before proceeding.
- If you have a promotion code, enter it and click Validate Code. Confirm that any discount appears in the order total.
- Under Billing Details, select Existing Customer Login to sign in, or Create a New Account to enter your personal information, billing address and account security details.
Use a working email address you can already access for order updates and account verification. Your new AmailPlus mailbox may not be ready until the service has been activated and configured.
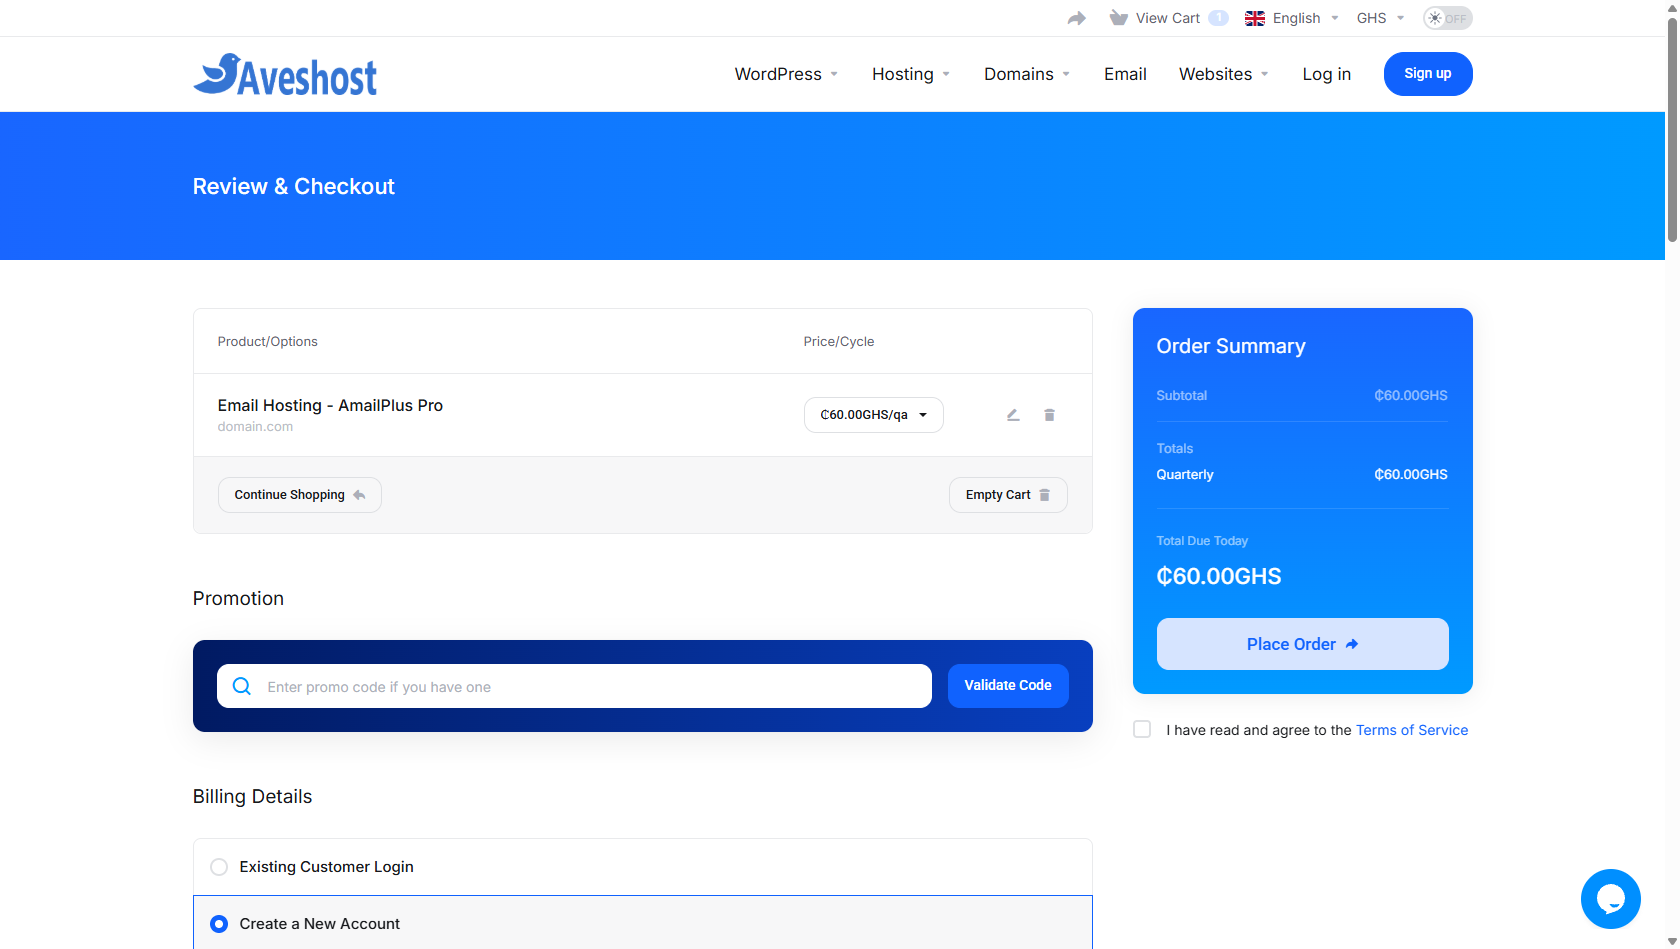
Review your cart and choose an existing account or create a new one.
6. Complete your order
- Choose one of the available options under Payment Method.
- Review your optional communication preferences and add order notes if needed.
- Check the Order Summary, including the currency, recurring billing period and Total Due Today.
- Read the Terms of Service and tick the agreement box if you accept them.
- Click Place Order, then follow the payment instructions shown to complete payment.
The checkout shown offers Paystack, Flutterwave, PayPal and cryptocurrency. Use the options available in your own checkout. Keep your order confirmation and payment reference, and check your account for the invoice and service status.
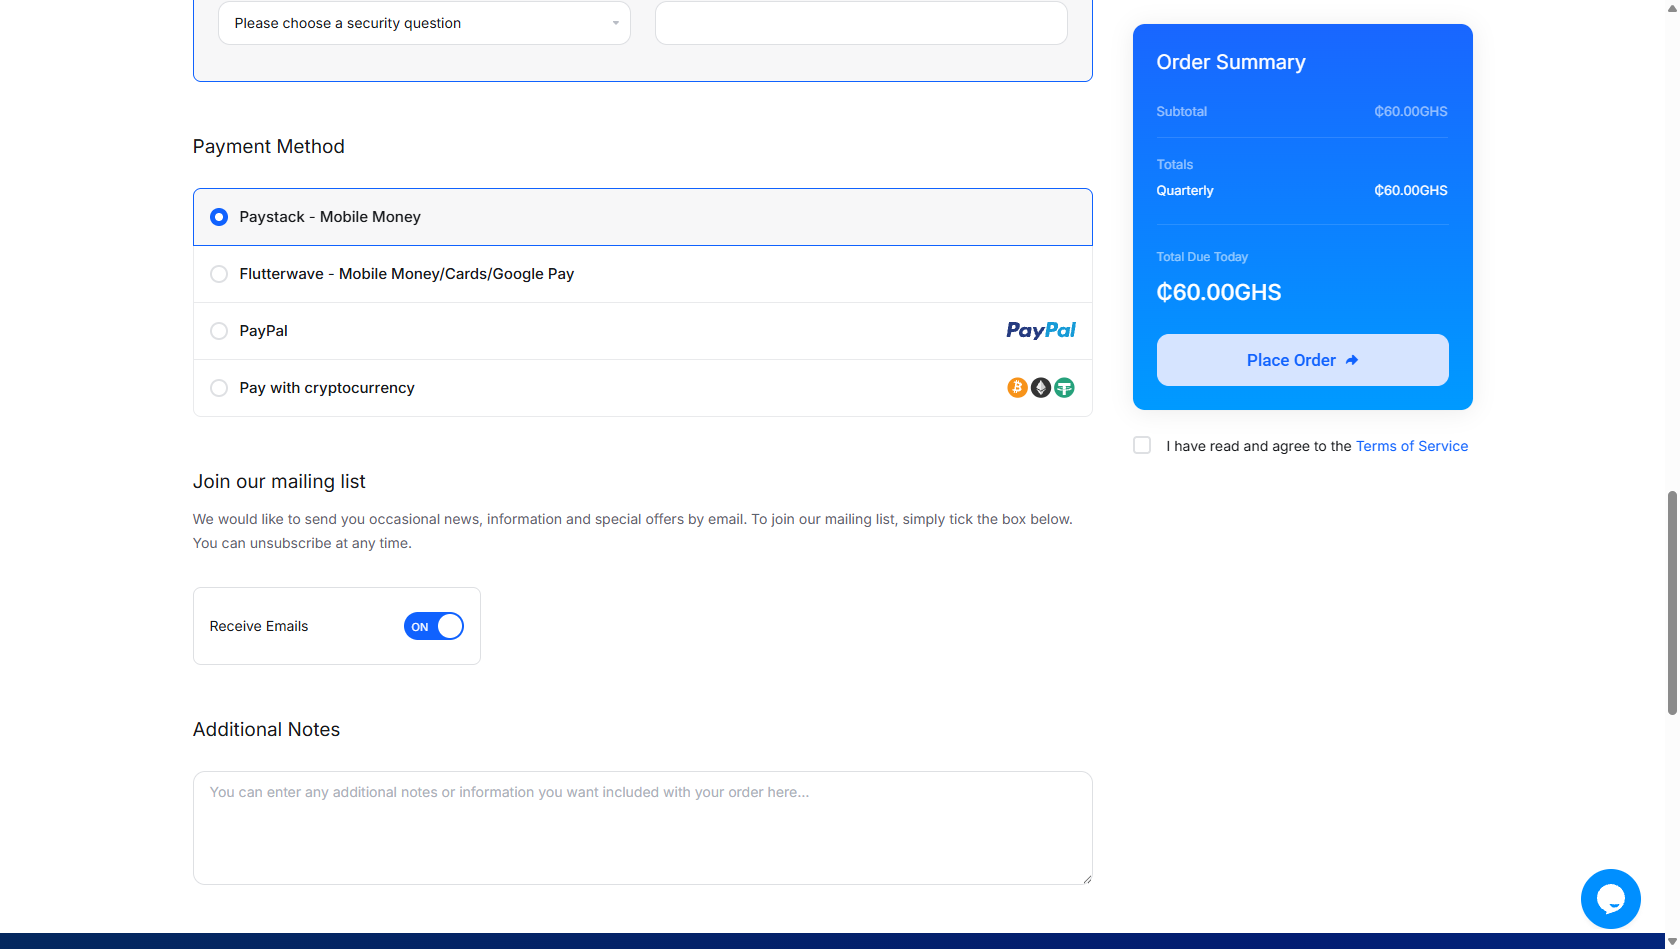
Select a payment method, review the terms and place your order.
What happens next?
After payment and service activation, follow Aveshost's setup instructions to configure the domain's email DNS records and create your mailboxes. Once your mailbox is ready, sign in at webmail.amailplus.com with your full email address, such as [email protected], and mailbox password.
Buying email hosting does not by itself transfer old messages or finish DNS setup. If you are moving from another email provider, arrange migration before switching mail delivery.
Need help? Contact Aveshost Support for assistance choosing a plan, completing payment, connecting your domain or migrating your email.
