


If your domain's DNS is managed by another provider, you can connect it to Aveshost AmailPlus by adding the required mail records at that provider. The same process applies when the domain is registered with Aveshost but its DNS is hosted elsewhere.
The records must be added where your domain's authoritative DNS is managed. You do not need to transfer the domain or move your website simply to use AmailPlus email.
Before you begin
- Confirm that your AmailPlus service is active and the correct domain is associated with it.
- Make sure you can sign in to the DNS management panel for that domain.
- Keep a copy of your existing DNS records before making changes.
- If you are switching email providers, prepare the new mailboxes and arrange any message migration before changing mail delivery.
- Replace domain.com with your own domain wherever an example is used.
Find your AmailPlus DNS records
- Sign in to the Aveshost client area.
- Open Services or My Products & Services, then select your AmailPlus email service.
- On the product details page, select Domain & DNS Setup.
- Check the domain shown beside Essential Domain DNS Records.
- Use the Name and Value buttons beside each record to copy its details into your DNS provider's form.
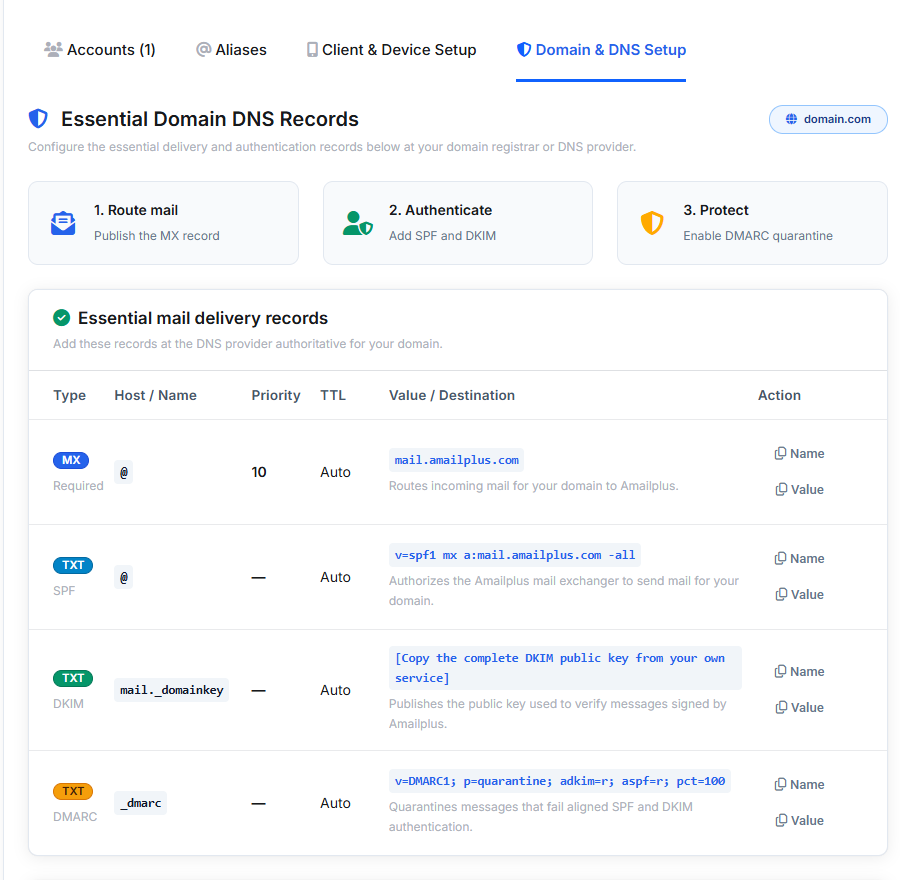
The AmailPlus DNS panel. The customer domain is replaced with domain.com and the domain-specific DKIM key is concealed with a placeholder. Copy the real key from your own service.
Use the records displayed for your own service. The values below reflect the AmailPlus panel when this guide was prepared. If your panel shows updated values, use those values or ask Aveshost Support to confirm them.
Host names and TTL: @ means the root domain, such as domain.com. Some DNS providers use a blank host field instead. The panel specifies Auto for TTL; use your provider's Auto or default setting. If a numeric TTL is required, 3600 seconds is a typical choice. Check whether the provider automatically appends your domain to record names so you do not enter it twice.
1. Add the MX record — incoming mail
The MX record directs incoming email for your domain to AmailPlus.
| Type | Host / Name | Value / Destination | Priority | TTL |
|---|---|---|---|---|
| MX | @ |
mail.amailplus.com |
10 | Auto |
- Open your domain's DNS zone at its authoritative DNS provider.
- Add or update an MX record with the values above.
- When you are ready to move incoming mail to AmailPlus, remove old MX records pointing to the previous email provider, unless Aveshost has given you a specific coexistence configuration.
Enter the server name without https://, a port number or an email address. Keep unrelated website records in place.
2. Add the SPF record — authorised senders
SPF tells receiving servers which systems may send email for your domain.
| Type | Host / Name | Value | TTL |
|---|---|---|---|
| TXT | @ |
v=spf1 mx a:mail.amailplus.com -all |
Auto |
If an SPF record already exists, do not add a second one. Update the existing record instead. If your domain also sends email through a website, newsletter platform or another legitimate service, its authorisation must be preserved in one combined SPF record. Ask Aveshost Support to help combine the requirements if you are unsure.
The value above is the configuration supplied by the AmailPlus panel. Its -all ending means other senders are not authorised, so do not replace a working multi-service SPF record without reviewing those senders.
3. Add the DKIM record — message signing
DKIM publishes the public key that recipients use to verify messages signed by AmailPlus.
| Type | Host / Name | Value | TTL |
|---|---|---|---|
| TXT | mail._domainkey |
Copy the complete DKIM value from your own AmailPlus Domain & DNS Setup panel. | Auto |
- Find the row labelled DKIM in the client area.
- Click its Value copy button. The value begins with
v=DKIM1;and includes a long public key afterp=. - Create a TXT record named
mail._domainkeyand paste the complete copied value. - Check that no characters were omitted and that you did not paste the placeholder from this guide.
For domain.com, the full record name is mail._domainkey.domain.com. Enter the full name only if your provider requires it. AmailPlus uses a TXT record here; do not substitute another provider's DKIM CNAME.
Review any existing record at this exact selector before replacing it. DKIM records using other selectors may belong to other legitimate sending services and should not be removed indiscriminately.
4. Add the DMARC record — authentication policy
The AmailPlus panel recommends the following DMARC policy:
| Type | Host / Name | Value | TTL |
|---|---|---|---|
| TXT | _dmarc |
v=DMARC1; p=quarantine; adkim=r; aspf=r; pct=100 |
Auto |
This asks receiving systems to quarantine messages that fail DMARC authentication. A message can pass through aligned SPF or aligned DKIM; both do not have to pass. The adkim=r and aspf=r settings use relaxed alignment.
Confirm that your legitimate sending services authenticate correctly before enforcing quarantine. If a DMARC record already exists at _dmarc, review and update it rather than adding a duplicate. Preserve any existing reporting settings you still need, with help from Aveshost Support if necessary.
Optional: Add automatic discovery records
Under Advanced automatic discovery, click Show advanced records. These optional SRV records help compatible mail applications discover secure connection settings; they do not replace MX, SPF, DKIM or DMARC.
| Type | Host / Name | Priority | Weight | Port | Target |
|---|---|---|---|---|---|
| SRV | _imaps._tcp |
0 | 0 | 993 | imap.amailplus.com |
| SRV | _pop3s._tcp |
10 | 0 | 995 | pop.amailplus.com |
| SRV | _submissions._tcp |
0 | 0 | 465 | smtp.amailplus.com |
| SRV | _submission._tcp |
10 | 0 | 587 | smtp.amailplus.com |
Use Auto for TTL. Some providers split the service, protocol, priority, weight, port and target into separate fields. For example, _imaps._tcp corresponds to service _imaps and protocol _tcp. The panel's value 0 993 imap.amailplus.com means weight 0, port 993 and target imap.amailplus.com; the priority is listed separately.
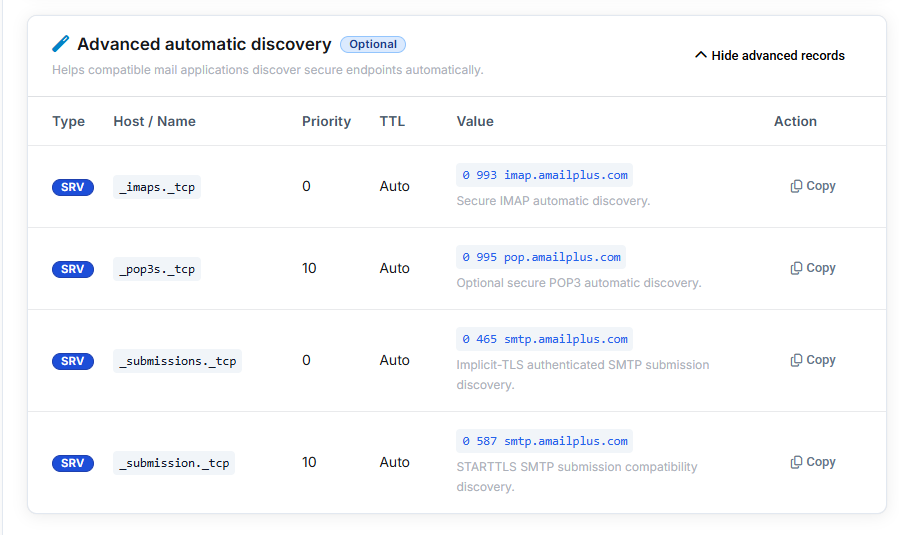
Expand Show advanced records to view the optional SRV settings.
Save your changes and allow DNS to update
- Save each new or updated record in your DNS provider's panel.
- Recheck the host names, record types and complete values.
- If your provider offers an HTTP proxy, keep mail host records DNS-only where that setting applies. MX and TXT records are normally not proxied.
- Allow cached DNS answers to expire. Updates may appear quickly, but some resolvers can continue using old values until the previous TTL expires; allow up to 48 hours before assuming a propagation delay is a fault.
You normally do not need to change nameservers when you can edit the correct DNS zone. Changing nameservers affects more than email, so obtain guidance before doing so.
Verify your setup
- Confirm that a public DNS lookup returns the AmailPlus MX record and your saved SPF, DKIM and DMARC TXT records.
- Sign in to AmailPlus webmail with a mailbox that has already been created.
- Send a test message from an external address to your AmailPlus mailbox.
- Send a message from AmailPlus to an external address and reply to it.
- Check both Inbox and Spam folders. Where available, inspect the received message's authentication results for SPF, DKIM and DMARC.
For sign-in instructions, see How to Access Your AmailPlus Email.
Common issues
- Incoming messages are missing: Confirm that you edited the authoritative DNS zone, the MX destination and priority are correct, old conflicting MX records are removed, and the recipient mailbox exists. Allow for cached DNS results.
- Messages are rejected or sent to spam: Check that only one SPF record is published and that it authorises every legitimate sender. Confirm DKIM is published in full and review DMARC alignment.
- Your email app cannot send: Check the authenticated SMTP settings under Client & Device Setup. DNS authentication records alone do not fix a wrong username, password, server, port or encryption setting.
- DKIM is not found: Verify the TXT record is at
mail._domainkey, the domain was not appended twice, and the full key was copied from the correct AmailPlus service. - DNS changes have no effect: Check which nameservers are authoritative. Editing records at a registrar that does not host your active DNS will not update the live domain.
Need assistance?
Contact Aveshost Support with your domain name, the company managing its DNS, the error or delivery issue you see, and a screenshot of the relevant DNS records. Do not include passwords or private keys.
