


Adding an additional domain name (often referred to as an Addon Domain) to your DirectAdmin web hosting account allows you to host multiple separate websites under a single account. Each domain operates independently with its own website directory (document root), DNS records, email accounts, SSL certificates, and statistics.
In this comprehensive guide, we will walk you through the entire step-by-step process of adding and configuring a domain name inside DirectAdmin, pointing your DNS nameservers, setting up SSL, and uploading your website files.
Prerequisites
- An active Web Hosting plan with DirectAdmin (or Reseller/VPS account).
- A registered domain name (e.g.,
yourdomain.com). - Access to your DirectAdmin control panel.
- Your domain's nameservers pointed to Aveshost (refer to Where to find Aveshost nameservers).
Step-by-Step Guide: How to Add a Domain in DirectAdmin
Step 1: Log in to DirectAdmin Control Panel
Log in to your DirectAdmin control panel via your Aveshost Client Area or directly through your server URL (e.g., https://usnyc.aveshost.net:2222). If you need help logging in, please see our guide on How to Login to DirectAdmin Control Panel.
Step 2: Navigate to Domains in Account Manager
Once logged in to the DirectAdmin dashboard:
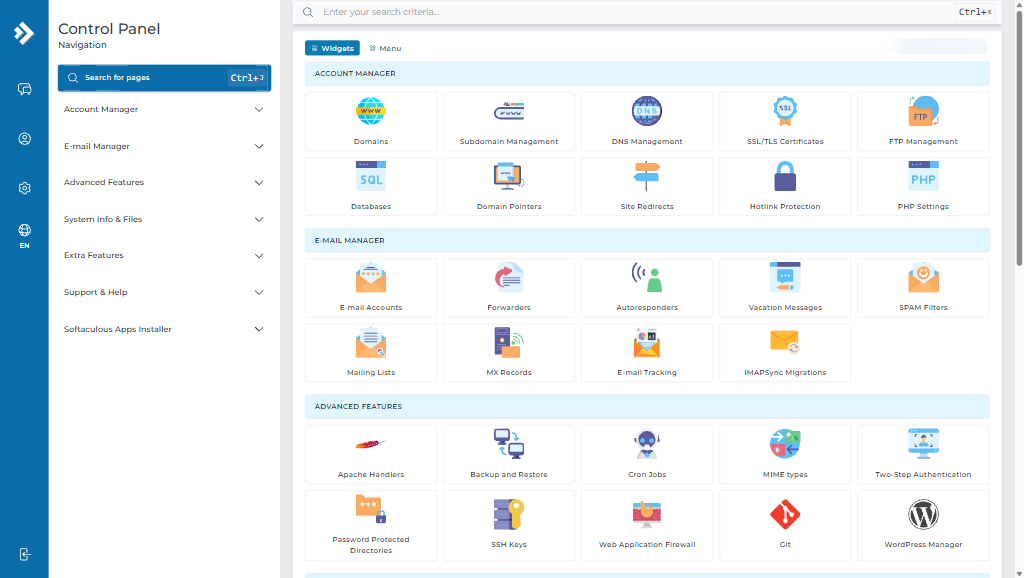
- Locate the Account Manager section in the main navigation menu on the left (or in the dashboard grid).
- Click on Domains (or Domain Management).
Step 3: Click "ADD NEW"
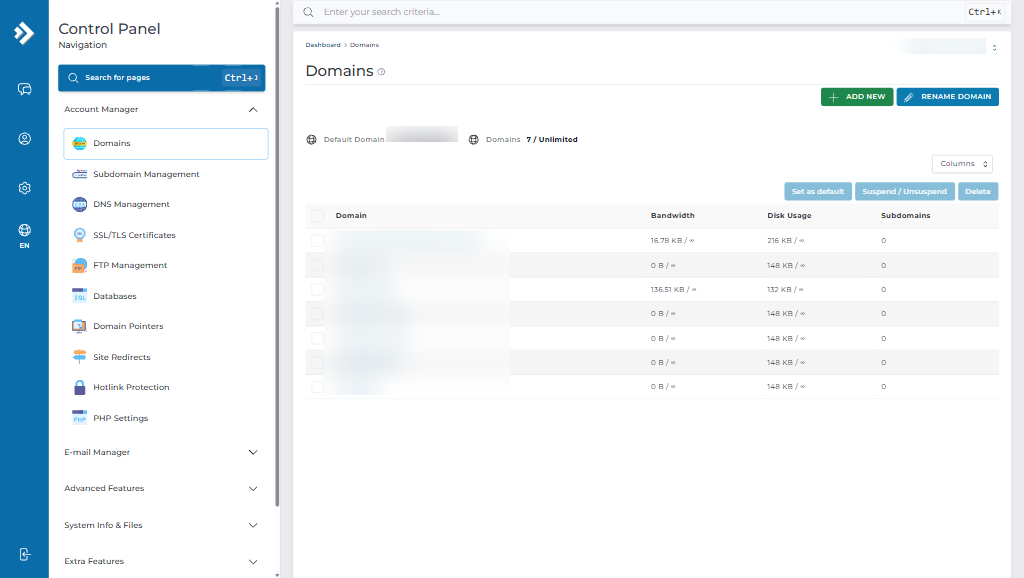
On the Domains management page, you will see a list of all domains currently associated with your hosting account. Click the ADD NEW button located near the top right above the domain list table.
Step 4: Enter Domain Details and Options
On the Create Domain page, enter the new domain name and customize the resource and feature settings:
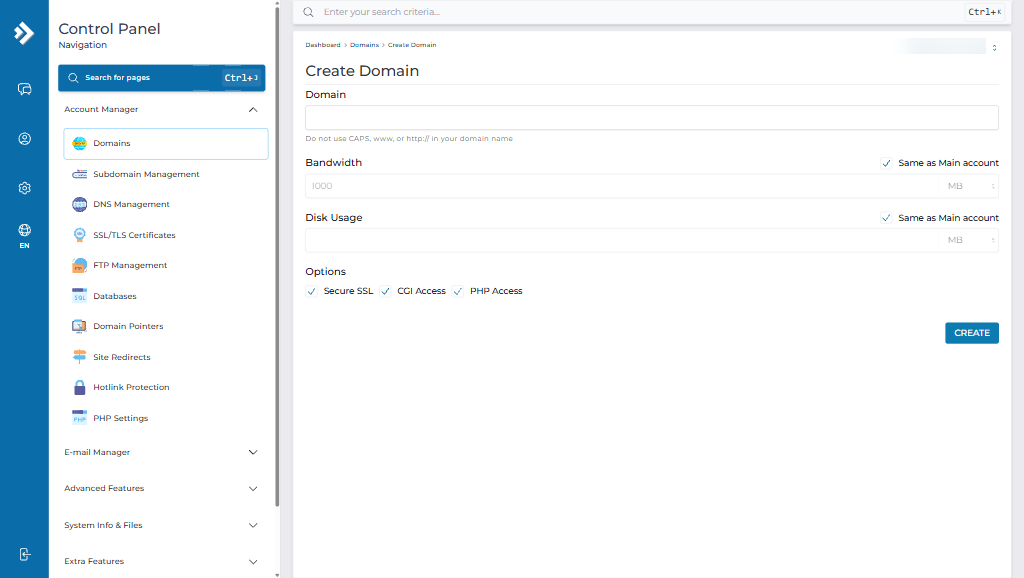
Here is an explanation of each field:
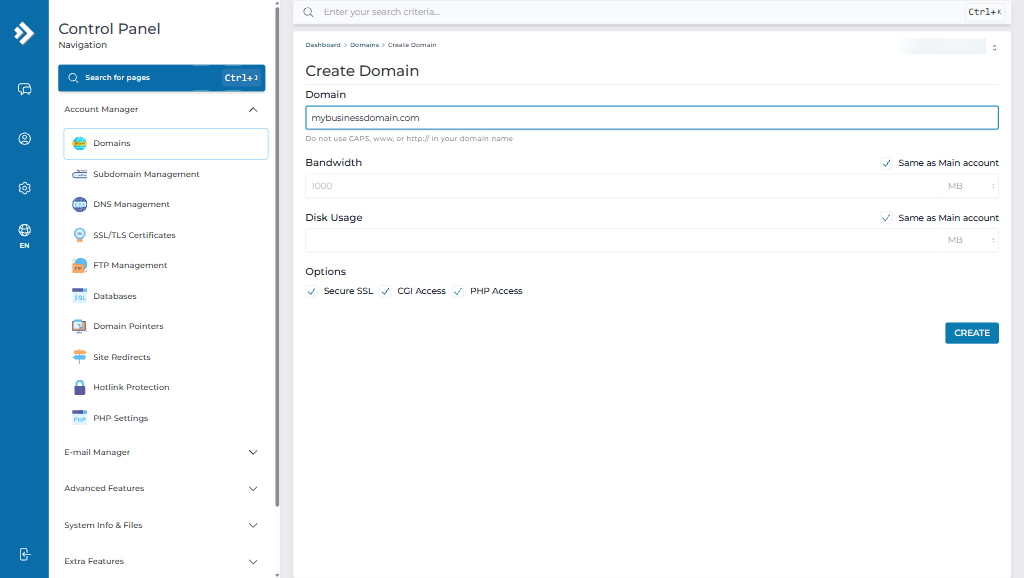
- Domain: Enter your domain name without
http://,https://, orwww(for example:mybusinessdomain.com). - Bandwidth: Leave "Same as Main account" checked to allow the domain to share your overall monthly bandwidth quota, or uncheck it to assign a dedicated monthly bandwidth limit (e.g., 5000 MB).
- Disk Usage: Leave "Same as Main account" checked to allow the domain to share your overall hosting disk space, or uncheck it to enforce a specific disk quota.
- Secure SSL: Ensure this checkbox is checked (enabled). This activates SSL support on the domain so you can generate free HTTPS certificates via Let's Encrypt.
- CGI Access: Check this option if your website requires CGI or Perl script execution.
- PHP Access: Ensure this checkbox is checked (enabled) if your site uses PHP (required for WordPress, Laravel, Joomla, OpenCart, and most modern web applications).
Below is an example of the form properly filled out:
Step 5: Click "CREATE" to Finish
Once you have verified your settings, click the green CREATE button at the bottom of the page. DirectAdmin will instantly set up the new domain, generate its directory structure, create default DNS zone entries, and add mail routing rules.
Where to Upload Files for the New Domain (Document Root)
When you add a new domain in DirectAdmin, a dedicated directory structure is automatically created under your user account:
/home/yourusername/domains/yournewdomain.com/public_html/
Important Note on File Placement:
- All web files (such as
index.php,index.html, CSS, JavaScript, images, or CMS files) for your new domain must be uploaded inside:domains/yournewdomain.com/public_html/ - Do not upload the new domain's files into the root
public_html/folder (which is reserved for your primary account domain). - For step-by-step instructions on uploading files, check out our guide on How to Upload Your Website in DirectAdmin.
Next Essential Steps After Adding Your Domain
1. Point Your Domain to Aveshost Nameservers (DNS)
For your newly added domain to point and resolve to your hosting account, you will need to set the correct nameservers at the registrar where your domain is registered. Because nameservers differ based on your specific hosting plan and server location, please follow our step-by-step guide on Where to find Aveshost nameservers to find and apply the exact nameservers assigned to your account.
Note: DNS changes can take between 1 to 24 hours to fully propagate worldwide across all Internet Service Providers (ISPs).
2. Install Free SSL Certificate (Let's Encrypt)
To enable HTTPS padlock security on your new domain:
- In DirectAdmin, switch the active domain at the top right to your newly added domain.
- Go to Account Manager > SSL/TLS Certificates.
- Select "Free & automatic certificate from Let's Encrypt".
- Select
yournewdomain.comandwww.yournewdomain.com. - Click Save. Once issued, enable "Force SSL with https redirect".
3. Create Professional Email Accounts
You can create customized email addresses for your new domain (e.g., [email protected]):
- Navigate to E-mail Manager > E-mail Accounts.
- Select your new domain and click CREATE ACCOUNT.
- Set your username, password, and mailbox quota, then click Create.
Frequently Asked Questions & Troubleshooting
Q: I received an error saying "Domain already exists". What should I do?
A: This error occurs if the domain is already assigned to another account on the server or configured in DNS records. If you own the domain and previously set it up elsewhere on the server, remove the old instance or contact Aveshost Support for assistance.
Q: Why does my new domain show a placeholder page or 404/403 Forbidden?
A: Make sure you have uploaded an index.html or index.php file inside /domains/yournewdomain.com/public_html/, and verify that your domain's nameservers have finished propagating (see Where to find Aveshost nameservers).
Q: How do I delete or rename a domain in DirectAdmin?
A: Go to Account Manager > Domains. Select the checkbox next to the domain name. You can then click Delete to remove the domain and its files, or click RENAME DOMAIN to change the domain name without losing files.
Need Further Assistance?
If you encounter any issues while adding a domain or configuring DNS in DirectAdmin, our 24/7 technical support team is here to assist you. Feel free to open a support ticket through your client area.
