


Netlify is one of the most popular cloud platforms for building, deploying, and hosting modern web applications, static websites, and Jamstack projects (React, Next.js, Vue, Astro, Nuxt, SvelteKit, and Hugo). By default, every new project deployed on Netlify is assigned a generic subdomain ending in .netlify.app (such as https://my-awesome-site.netlify.app).
Connecting a custom domain name registered with Aveshost (such as domain.com, www.domain.com, or an application subdomain like app.domain.com) replaces the generic Netlify address with your own brand identity and activates automatic, free Let’s Encrypt HTTPS SSL encryption.
In this comprehensive, beginner-friendly guide, we will walk you through every method for connecting your Aveshost custom domain to Netlify — whether your domain is managed in the Aveshost Client Area, attached to a DirectAdmin hosting plan, or delegated to Netlify DNS — complete with visual step-by-step screenshots.
Prerequisites
- A custom domain name registered with Aveshost (see How to Register a Domain Name).
- Access to your Aveshost Client Area (or DirectAdmin control panel if your domain is connected to a shared hosting plan).
- An active site deployed on Netlify.
Quick Reference: Official Netlify DNS Target Values
If you prefer to keep your domain’s nameservers on Aveshost (Recommended if you use Aveshost for business emails or other subdomains), use the following official Netlify External DNS records:
| Domain Target | Record Type | Host / Name | Value / Points To |
|---|---|---|---|
| Root / Apex Domain (domain.com) | A |
@ (or leave blank) |
75.2.60.5 (Netlify Global Load Balancer IP) |
| WWW Subdomain (www.domain.com) | CNAME |
www |
your-site-name.netlify.app |
| Custom Subdomain (app.domain.com) | CNAME |
app (or docs, portal, etc.) |
your-site-name.netlify.app |
Step 1: Add Your Custom Domain to Your Netlify Site
Before updating your DNS records on Aveshost, register your custom domain inside your Netlify project dashboard:
- Log in to your Netlify Dashboard and select the site you want to connect.
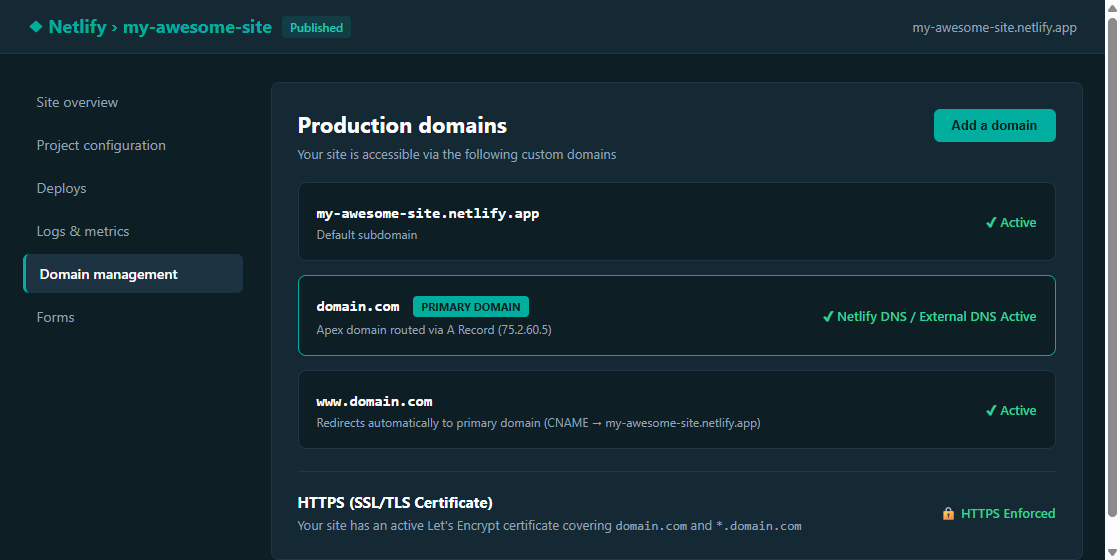
- In the left navigation sidebar, click on Domain management.
- Under the Production domains section, click the Add a domain button.
- Enter your custom domain name (e.g.
domain.comorapp.domain.com) and click Verify. - When prompted asking if you are the domain owner, click Add domain.
- Netlify will automatically add both
domain.com(Primary domain) andwww.domain.comto your production domains list.
Step 2: Configure DNS Records on Aveshost (Choose Your Scenario)
Depending on how you manage your domain on Aveshost, follow Method A, Method B, or Method C below:
Method A: Using Aveshost Client Area DNS Management (Domain-Only)
Use this method if your domain is registered on Aveshost without a shared hosting plan:
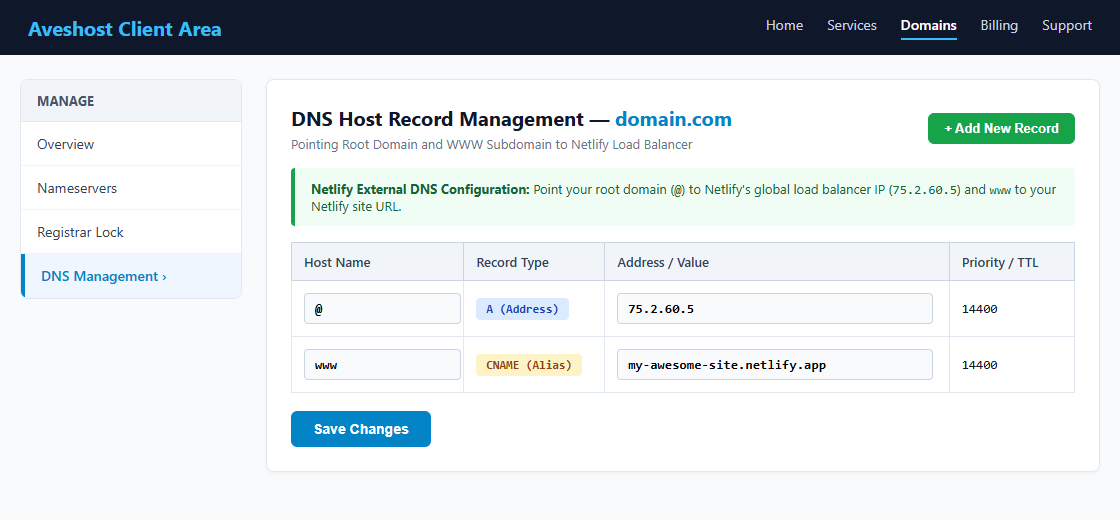
- Log in to your Aveshost Client Area and go to Domains > My Domains.
- Click Manage next to your domain.
- Click Nameservers in the left sidebar and ensure your domain is pointed to Aveshost’s default nameservers (
ns1.globaldomaingroup.comandns2.globaldomaingroup.com). - Click DNS Management in the left sidebar.
- Remove any old parking
AorCNAMErecords for@andwww, then click + Add New Record to add the Netlify records:- Record 1 (Root Domain): Host Name:
@| Record Type:A (Address)| Address:75.2.60.5| TTL:14400 - Record 2 (WWW Subdomain): Host Name:
www| Record Type:CNAME (Alias)| Address:your-site-name.netlify.app| TTL:14400
- Record 1 (Root Domain): Host Name:
- Click Save Changes.
Method B: Using DirectAdmin DNS Management (Shared Hosting / Subdomain)
Use this method if your domain is connected to an Aveshost Shared Web Hosting plan (DirectAdmin) — for instance, if your emails or main website run on DirectAdmin, or you want to point a subdomain like app.domain.com to Netlify:
- Log in to your DirectAdmin Control Panel (see How to Login to DirectAdmin Control Panel).
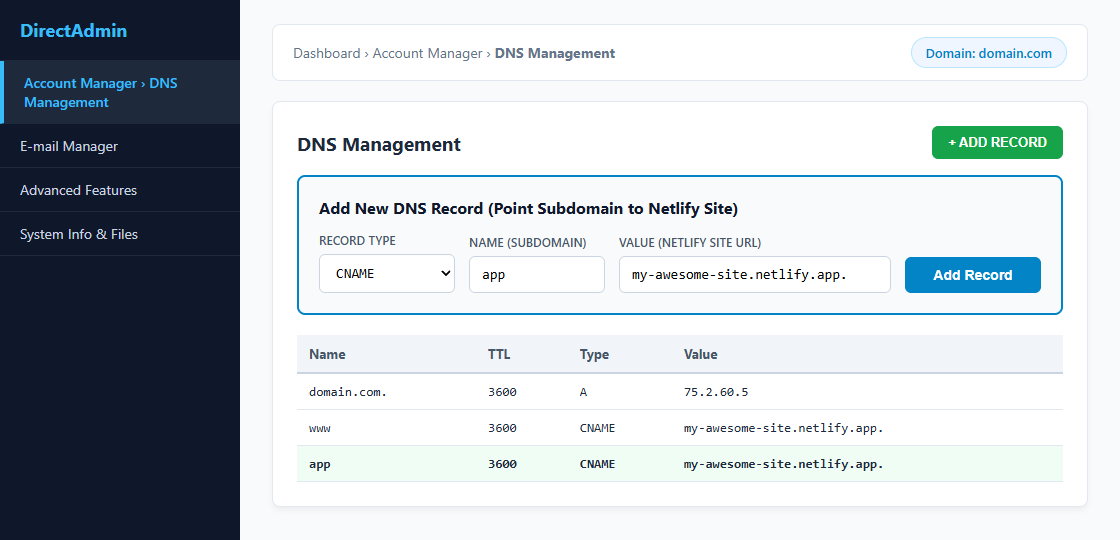
- Navigate to Account Manager > DNS Management.
- Click the green + ADD RECORD button.
- To Point a Subdomain (e.g.
app.domain.com) to Netlify:- Record Type: Select
CNAME - Name: Enter your subdomain prefix (e.g.
app) - Value: Enter
your-site-name.netlify.app.(Important: Include the trailing period.at the end so DirectAdmin does not append your domain name to the target). - Click Add.
- Record Type: Select
- To Point Your Root Domain (
domain.com) to Netlify in DirectAdmin:- Delete the existing root
Arecord fordomain.com.and existingwwwrecord. - Click + ADD RECORD → Type:
A| Name:domain.com.(or leave blank) | Value:75.2.60.5. - Click + ADD RECORD → Type:
CNAME| Name:www| Value:your-site-name.netlify.app.(with trailing dot).
- Delete the existing root
Method C: Delegating Nameservers to Netlify DNS (Alternative Option)
If you are not using Aveshost shared hosting or email services on your domain and want Netlify to manage all of your DNS zones (including automatic branch subdomains):
- In your Netlify Dashboard under Domain management, click Options next to your domain and select Set up Netlify DNS.
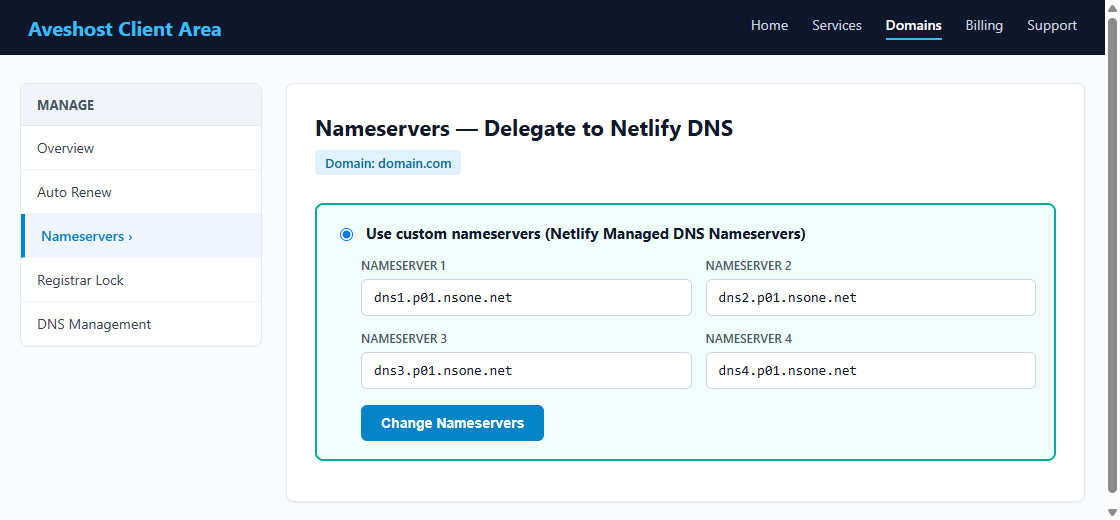
- Follow the steps until Netlify displays your 4 assigned NS1 nameservers (for example:
dns1.p01.nsone.net,dns2.p01.nsone.net,dns3.p01.nsone.net,dns4.p01.nsone.net— note that the exactp01number varies per account, so copy the exact ones shown in your Netlify dashboard). - In your Aveshost Client Area, go to Domains > Manage > Nameservers.
- Select Use custom nameservers, paste the 4 Netlify nameservers into Nameserver 1 through 4, and click Change Nameservers.
[email protected]), do not change your nameservers to Netlify DNS unless you manually copy all of your MX, SPF, DKIM, and mail records into Netlify first. Instead, use Method A or Method B above so your emails continue working without interruption.Step 3: Verify SSL/TLS Certificate (HTTPS) on Netlify
Once your DNS records propagate (typically within 5 to 30 minutes):
- Return to your Netlify Dashboard > Domain management.
- Scroll down to the HTTPS (SSL/TLS certificate) section at the bottom of the page.
- Click Verify DNS configuration (if Netlify has not already detected the change automatically).
- Netlify will automatically provision and install a free Let’s Encrypt SSL certificate covering both
domain.comandwww.domain.com, and enable automatic HTTP-to-HTTPS redirection!
Step 4: Test Your Domain Resolution
You can verify that your Aveshost domain is properly pointing to Netlify by opening your terminal or command prompt and running:
# Check Root Domain A Record (should return 75.2.60.5):
nslookup domain.com

# Check WWW Subdomain CNAME Record (should return your-site-name.netlify.app):
nslookup www.domain.com
Frequently Asked Questions & Troubleshooting
Q: Netlify shows "Awaiting External DNS". How long does it take?
A: External DNS updates typically resolve within 10 to 30 minutes, though global ISP caching can occasionally take up to 24 hours. Make sure you removed any old conflicting A or AAAA (IPv6) records on your domain, as leftover IPv6 records will prevent Netlify from verifying your domain.
Q: Why is Let's Encrypt SSL failing to provision on Netlify?
A: The most common cause is an old AAAA (IPv6) record left in your DNS zone pointing to a different server, or a missing trailing dot (.) on the CNAME record in DirectAdmin. Remove any unused AAAA records and click Renew certificate / Verify DNS in Netlify.
Q: Should I set domain.com or www.domain.com as the Primary Domain in Netlify?
A: Either works seamlessly! When you point @ to 75.2.60.5 and www to your-site-name.netlify.app, Netlify’s global CDN automatically redirects whichever one is secondary to your chosen Primary domain with a 301 SEO redirect.
Need Further Assistance?
If you need any assistance pointing your Aveshost domain to Netlify, configuring CNAME records, or keeping your business emails active alongside your Netlify web app, our technical support team is available 24/7. Feel free to submit a support ticket through your client area for prompt assistance.
