


Blogger (Blogspot) is Google’s popular, free blogging platform that allows creators and businesses to publish articles without managing web servers. By default, every new Blogger site is assigned a generic address ending in .blogspot.com (such as https://myaveshostblog.blogspot.com).
Connecting a custom domain name registered with Aveshost (such as www.domain.com and domain.com) replaces the generic .blogspot.com address with your own professional brand name, improves your search engine rankings (SEO), and includes a free Google-managed HTTPS SSL certificate.
In this comprehensive, step-by-step tutorial, you will learn how to get your unique Google verification CNAME records from Blogger, add the required CNAME and Google A Records in your Aveshost Client Area or DirectAdmin control panel, enable naked domain redirection, and activate free HTTPS encryption.
Prerequisites
- A custom domain name registered with Aveshost (see How to Register a Domain Name).
- Access to your Aveshost Client Area (or DirectAdmin control panel if your domain is connected to a shared hosting plan).
- An active blog on Blogger.com.
Quick Reference: Official Google Blogger DNS Records
To connect your Aveshost domain to Blogger so both www.domain.com and domain.com load your blog seamlessly, you will configure 2 CNAME Records and 4 Google IPv4 A Records:
| Record Type | Host / Name | Value / Destination / Points To | Purpose |
|---|---|---|---|
| CNAME | www (or blog) |
ghs.google.com |
Standard Google Host Server for Blogger |
| CNAME | Unique 12-char code (e.g. a1b2c3d4e5f6) |
Unique Google token (e.g. gv-x9y8z7w6v5u4.dv.googlehosted.com) |
Verifies your ownership of the domain in Blogger |
| A | @ (or blank) |
216.239.32.21 |
Google Root Domain Redirect IP #1 |
| A | @ (or blank) |
216.239.34.21 |
Google Root Domain Redirect IP #2 |
| A | @ (or blank) |
216.239.36.21 |
Google Root Domain Redirect IP #3 |
| A | @ (or blank) |
216.239.38.21 |
Google Root Domain Redirect IP #4 |
Step 1: Get Your Unique Verification CNAME Records from Blogger
Every Google account is assigned a unique security verification token in Blogger. Follow these steps to retrieve yours:
- Log in to your Blogger Dashboard.
- In the left sidebar menu, click on Settings.
- Scroll down to the Publishing section and click on Custom domain.
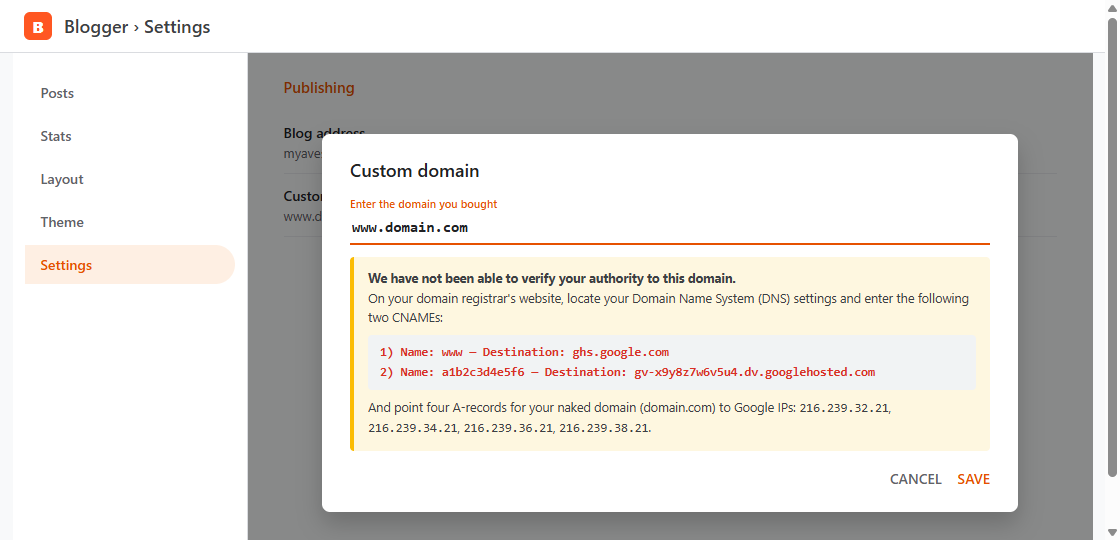
- In the popup box, enter your domain name with the
www.prefix (e.g.www.domain.com— Blogger requires entering a subdomain likewww.orblog.here rather than the naked domain). - Click Save.
- Blogger will display a yellow message saying: “We have not been able to verify your authority to this domain.” Inside that message, you will see your two CNAME records:
- CNAME #1 (Standard): Name:
www— Destination:ghs.google.com - CNAME #2 (Unique Security Token): A short code (Name) and a long destination ending in
.dv.googlehosted.com.
- CNAME #1 (Standard): Name:
- Keep this Blogger window open so you can copy and paste these values in Step 2, then return and click Save after adding the records.
Step 2: Add Blogger DNS Records on Aveshost (Choose Your Scenario)
Depending on whether your domain is managed directly in the Aveshost Client Area or attached to a DirectAdmin shared hosting account, choose Method A or Method B below:
Method A: Using Aveshost Client Area DNS Management (Domain-Only)
Follow this method if you purchased a domain name on Aveshost without a shared hosting plan:
- Log in to your Aveshost Client Area and navigate to Domains > My Domains.
- Click Manage next to your domain name.
- Click Nameservers in the left sidebar and ensure your domain points to Aveshost’s default nameservers (
ns1.globaldomaingroup.comandns2.globaldomaingroup.com). - Click DNS Management in the left sidebar.
- Remove any existing default parking
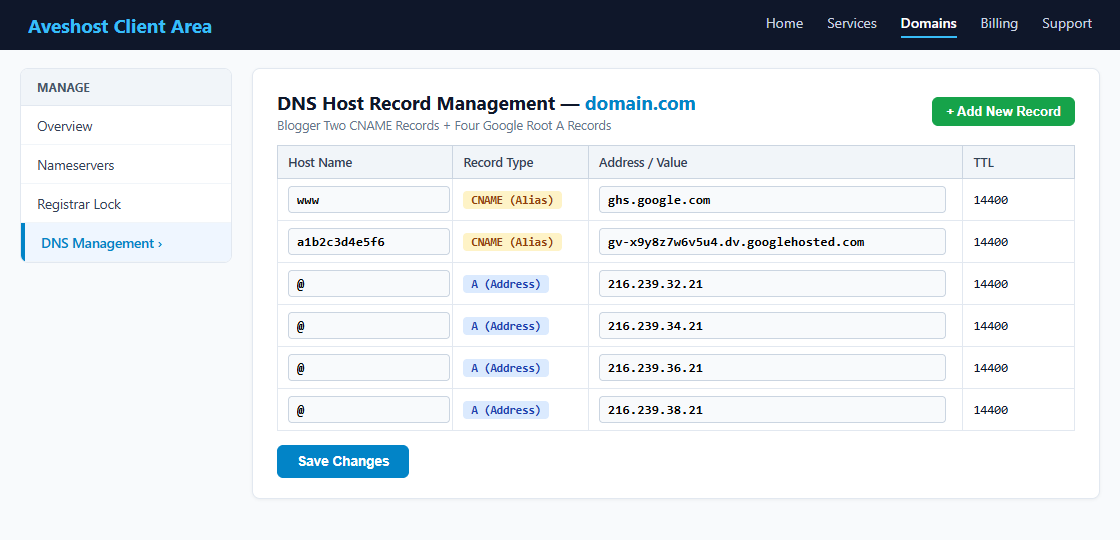
AorCNAMErecords for@andwww. - Click + Add New Record to add the 2 CNAME Records and 4 Google A Records:
- Record 1: Host Name:
www| Type:CNAME (Alias)| Address:ghs.google.com - Record 2: Host Name: Your short Blogger code | Type:
CNAME (Alias)| Address: Your long.dv.googlehosted.comcode - Records 3–6 (Root Domain Redirect): Add four
A (Address)records with Host Name@pointing to216.239.32.21,216.239.34.21,216.239.36.21, and216.239.38.21.
- Record 1: Host Name:
- Click Save Changes.
Method B: Using DirectAdmin DNS Management (Shared Hosting / Subdomain)
Follow this method if your domain is attached to an Aveshost Shared Web Hosting plan (DirectAdmin):
- Log in to your DirectAdmin Control Panel (see How to Login to DirectAdmin Control Panel).
- Navigate to Account Manager > DNS Management.
- Delete any conflicting
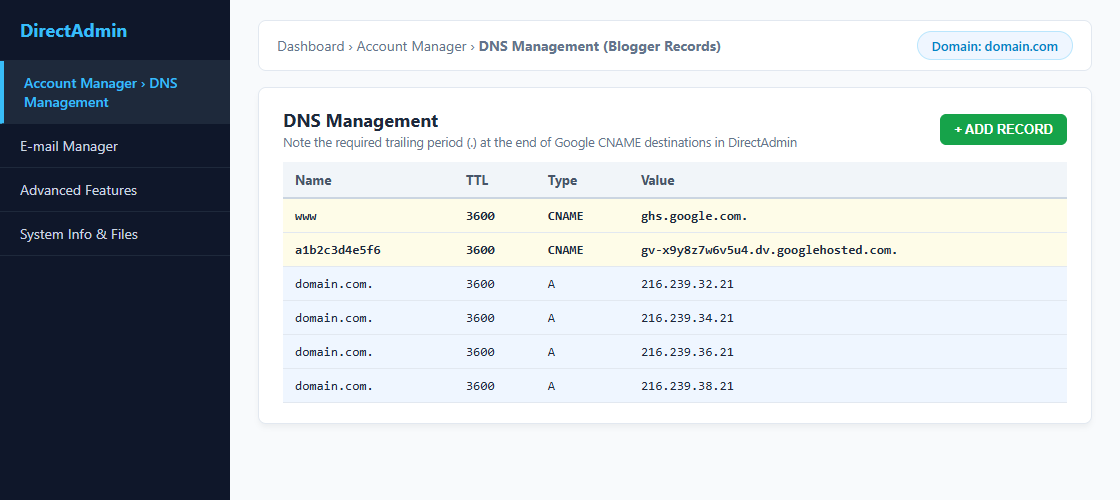
wwwrecord (and rootArecord if pointing the whole domain to Blogger). - Click the green + ADD RECORD button and add your records:
- First CNAME: Type:
CNAME| Name:www| Value:ghs.google.com. - Second CNAME: Type:
CNAME| Name: Your short Blogger code | Value:gv-x9y8z7w6v5u4.dv.googlehosted.com. - Four Root A Records: Type:
A| Name:domain.com.(or leave blank) | Values:216.239.32.21,216.239.34.21,216.239.36.21, and216.239.38.21.
- First CNAME: Type:
CNAME values in DirectAdmin, always include a trailing period (.) at the end of the destination (e.g. ghs.google.com. and gv-xxxx.dv.googlehosted.com.). Without the trailing dot, DirectAdmin appends your own domain name to the end of Google’s address.
Step 3: Save Your Custom Domain and Enable Redirects & HTTPS in Blogger
Wait 10 to 20 minutes for your new DNS records to propagate, then return to your Blogger dashboard:
- In the Blogger Custom domain popup window (from Step 1), click SAVE.
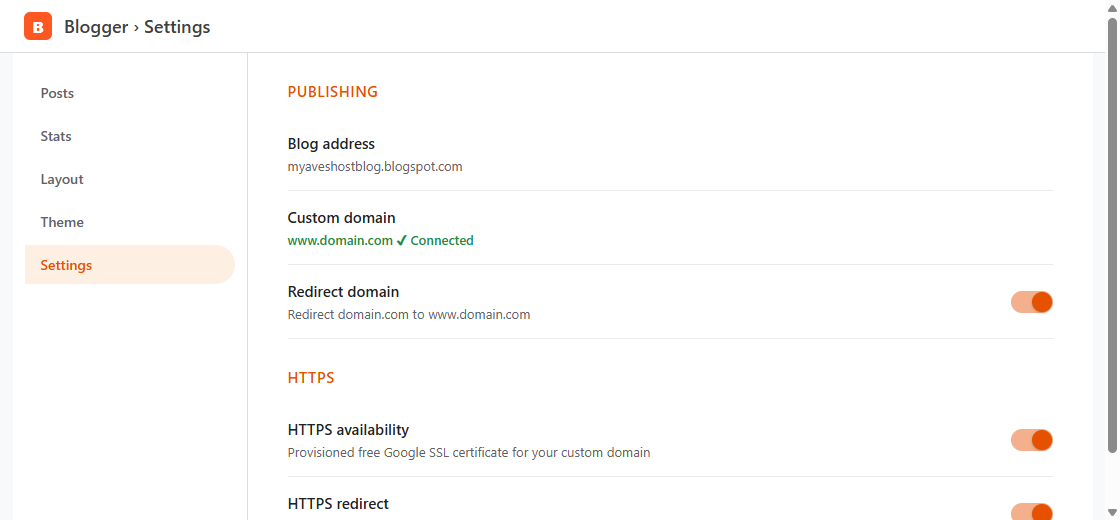
- Once verified, the popup will close and your custom domain (
www.domain.com) will be listed under Publishing. - Enable Naked Domain Redirect (Important!): Immediately below Custom domain, toggle Redirect domain to ON (Redirect domain.com to www.domain.com). This ensures visitors who type
domain.comwithoutwwware automatically directed to your blog instead of seeing a 404 error. - Enable Free Google HTTPS SSL: Scroll down to the HTTPS section and toggle both:
- HTTPS availability: Toggle ON (Google will automatically issue a free SSL certificate within 10–30 minutes).
- HTTPS redirect: Toggle ON (Forces all visitors onto secure
https://www.domain.com).
Frequently Asked Questions & Troubleshooting
Q: Why does Blogger still show "Could not update settings" when I click Save?
A: DNS changes typically take 10 to 30 minutes to propagate across Google’s resolvers. If it still fails after 30 minutes, check that you deleted any old conflicting www records and (if using DirectAdmin) included the trailing dot (.) at the end of both CNAME destination values.
Q: Why does www.domain.com work, but domain.com (without www) shows an error?
A: Make sure you added all four Google A records (216.239.32.21, 34.21, 36.21, 38.21) for your root domain (@) and toggled the Redirect domain switch to ON inside Blogger Settings.
Q: Why does my blog say "HTTPS Availability: Status Pending"?
A: After connecting a new domain, Google automatically requests and provisions an SSL certificate in the background. This process takes between 10 and 60 minutes. Once complete, the status changes to active and HTTPS redirect will begin working automatically.
Q: Will my old .blogspot.com links break after connecting a custom domain?
A: No! Blogger automatically redirects all of your existing yourblog.blogspot.com post URLs to the matching URLs on your new custom domain (www.domain.com), preserving all of your existing traffic and search engine rankings.
Need Further Assistance?
If you need any help adding your Blogger CNAME and A records or configuring your Aveshost domain, our technical support team is available 24/7. Feel free to submit a support ticket through your client area for prompt assistance.
