


Google Sites is a free, easy-to-use website builder included with every Google and Google Workspace account. By default, websites published on Google Sites use a long, generic web address such as https://sites.google.com/view/myaveshostsite.
Connecting a custom domain name registered with Aveshost (such as www.domain.com) replaces the default Google Sites URL with your own memorable brand address, strengthens trust with visitors, improves SEO, and automatically provisions a free Google-managed HTTPS SSL certificate.
In this comprehensive step-by-step guide, you will learn how to verify your domain ownership with Google using a TXT record, point your domain to Google Sites using a CNAME record (ghs.googlehosted.com) in either the Aveshost Client Area or DirectAdmin, forward your root domain, and publish your site on your custom domain.
Prerequisites
- A custom domain name registered with Aveshost (see How to Register a Domain Name).
- Access to your Aveshost Client Area (or your DirectAdmin control panel if your domain is connected to an Aveshost web hosting plan).
- A website created in Google Sites under your Google account.
Quick Reference: Required Google Sites DNS Records
To connect your Aveshost domain to Google Sites, you will add two DNS records:
| Record Type | Host / Name | Value / Destination / Points To | Purpose |
|---|---|---|---|
| TXT | @ (or blank / domain.com.) |
google-site-verification=YOUR_UNIQUE_CODE |
Verifies that you own the domain in Google Search Console |
| CNAME | www (or custom subdomain) |
ghs.googlehosted.com |
Routes your custom domain traffic to Google Sites servers |
ghs.googlehosted.com as its CNAME target (unlike Blogger, which uses ghs.google.com). Make sure to enter ghs.googlehosted.com exactly as shown.
Step 1: Start Custom Domain Setup in Google Sites & Get Your TXT Verification Code
Before Google Sites allows you to attach a custom domain, Google requires proof that you own the domain:
- Open your website in Google Sites.
- Click the Settings (gear icon ⚙) in the top-right corner of the editor (next to the Publish button).
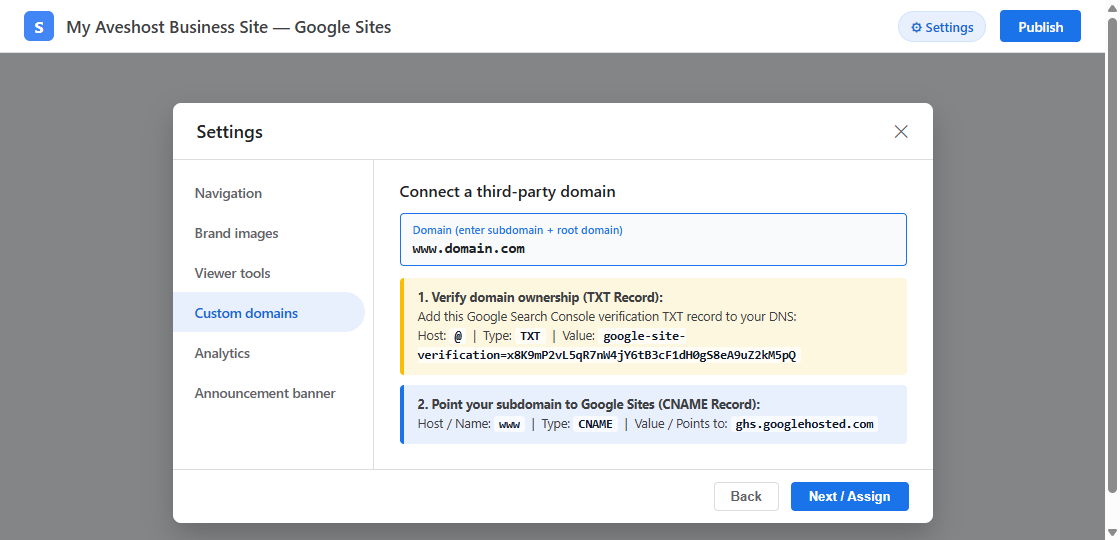
- In the left sidebar of the Settings popup, click Custom domains and click Start setup.
- Select Use a domain from a third-party and click Next.
- Enter your custom domain name with the
wwwprefix (for example,www.domain.com). - If your domain is not yet verified in your Google account, click the blue verify your ownership link. A Google verification window will open and provide a unique TXT record starting with
google-site-verification=.... - Copy your unique
google-site-verification=...string and keep the Google window open.
Step 2: Add the Google Sites TXT & CNAME Records on Aveshost (Choose Your Scenario)
Depending on how your domain is set up with Aveshost, follow either Method A (Domain-Only) or Method B (Shared Web Hosting / DirectAdmin) below:
Method A: Using Aveshost Client Area DNS Management (Domain-Only)
Use this method if you purchased a domain name from Aveshost without a web hosting package:
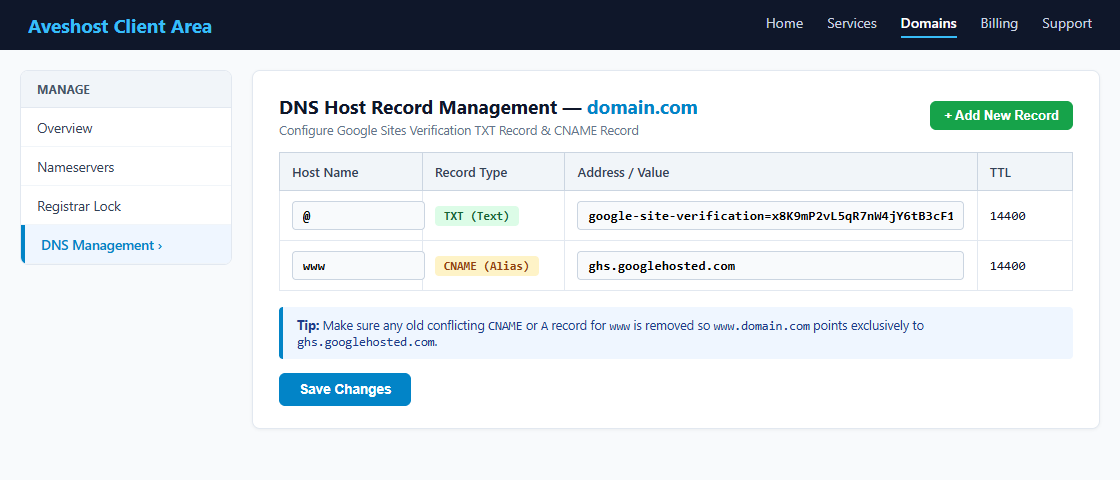
- Log in to your Aveshost Client Area and navigate to Domains > My Domains.
- Click Manage next to your domain name.
- Check Nameservers in the left menu and make sure your domain uses Aveshost’s default nameservers (
ns1.globaldomaingroup.comandns2.globaldomaingroup.com). - Click DNS Management in the left sidebar.
- Delete any existing default parking
CNAMEorArecord forwwwso it does not conflict. - Click + Add New Record and add the two Google Sites records:
- Record 1 (Ownership Verification):
Host Name:@| Record Type:TXT (Text)| Address / Value:google-site-verification=YOUR_UNIQUE_CODE - Record 2 (Google Sites Mapping):
Host Name:www| Record Type:CNAME (Alias)| Address / Value:ghs.googlehosted.com
- Record 1 (Ownership Verification):
- Click Save Changes.
Method B: Using DirectAdmin DNS Management (Shared Hosting / Subdomain)
Use this method if your domain uses Aveshost Web Hosting nameservers and is managed in DirectAdmin:
- Log in to your DirectAdmin Control Panel (see How to Login to DirectAdmin Control Panel).
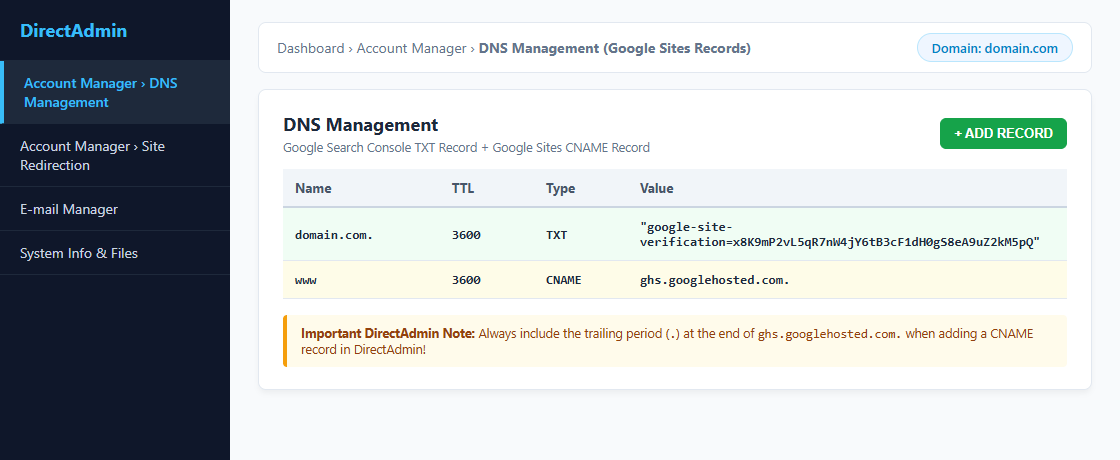
- Go to Account Manager > DNS Management.
- If you are pointing
www.domain.comto Google Sites, select the existingwwwrecord in the table and click Delete. - Click the green + ADD RECORD button in the top-right corner and add both records:
- Record 1 (TXT Verification):
Record Type:TXT| Name:domain.com.(or leave blank) | Value:google-site-verification=YOUR_UNIQUE_CODE - Record 2 (CNAME Mapping):
Record Type:CNAME| Name:www(or a subdomain likeportal) | Value:ghs.googlehosted.com.
- Record 1 (TXT Verification):
.) at the very end: ghs.googlehosted.com. — if you omit the trailing dot, DirectAdmin appends your own domain name to the end (turning it into ghs.googlehosted.com.domain.com), which will prevent Google Sites from loading.
Step 3: Verify Ownership, Assign the Domain & Publish Your Google Site
Wait 10 to 20 minutes for your DNS changes to propagate, then complete the connection in Google:
- Return to the Google Search Console verification tab you opened in Step 1 and click Verify. You will see a green confirmation message: “Ownership verified.” (Do not delete the TXT record from your DNS, as Google checks it periodically.)
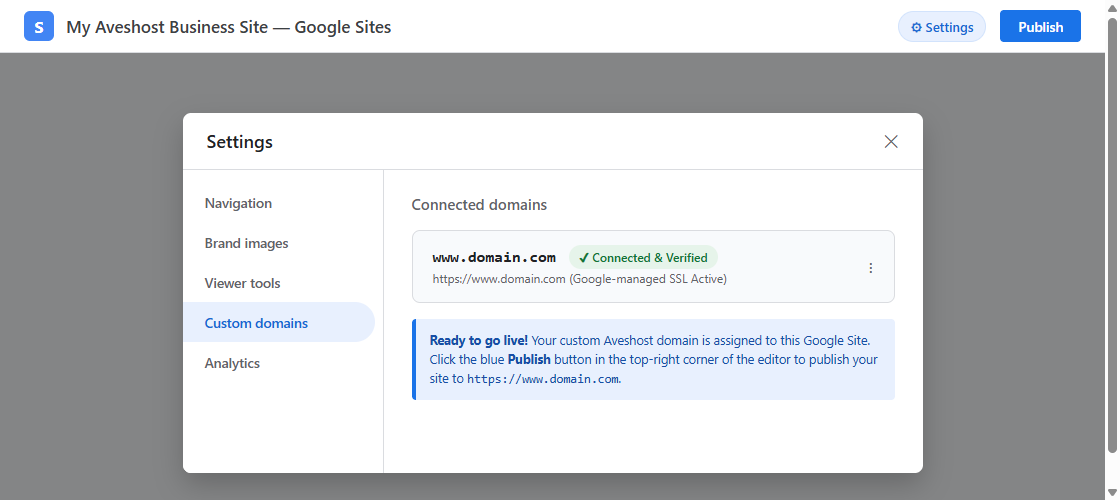
- Go back to your Google Sites editor tab (> Settings ⚙ > Custom domains).
- Enter
www.domain.com, click Next, and click Assign (or Done). - Finally, click the blue Publish button in the top-right corner of the Google Sites editor so your site is published to your custom domain.
- Automatic Free HTTPS SSL: Once assigned, Google automatically provisions an SSL certificate for
https://www.domain.comin the background (usually within 15 to 60 minutes).
Step 4 (Recommended): Redirect Your Root Domain (domain.com) to www.domain.com
Because Google Sites connects custom domains through a subdomain like www.domain.com, visitors who type your naked domain (domain.com without www) will not reach your site unless you set up a redirect:
- If using DirectAdmin (Shared Hosting): Go to Account Manager > Site Redirection, click Create New Redirect, leave the Local URL Path as
/, select 301 Permanent, and set the Destination URL tohttps://www.domain.com. - If using Domain-Only DNS Management: Add a URL Redirect (301 Permanent) record in DNS Management with Host Name
@pointing tohttps://www.domain.com.
Frequently Asked Questions & Troubleshooting
Q: Why does Google Search Console say "Ownership verification failed"?
A: New DNS records can take 10 to 30 minutes to propagate globally. Make sure the Host Name for your TXT record is set to @ (or domain.com. in DirectAdmin) and that there are no extra spaces before or after the google-site-verification=... string.
Q: Why does visiting www.domain.com show a 404 Not Found or privacy warning right after connecting?
A: First, ensure you clicked the blue Publish button in the top-right corner of Google Sites after assigning the domain. Second, wait 15 to 60 minutes for Google to finish issuing the free SSL certificate for your custom domain.
Q: Can I connect a Google Workspace Google Site to my Aveshost domain?
A: Yes! If your site was created inside a Google Workspace organization, open the Google Admin Console and go to Apps > Google Workspace > Sites > Custom URL, then add the exact same CNAME record (www pointing to ghs.googlehosted.com) in your Aveshost DNS.
Need Further Assistance?
If you need any help adding your Google Sites TXT verification record or CNAME record on your Aveshost domain, our support team is available 24/7. Feel free to submit a support ticket from your client area and we will gladly configure it for you.
