


WordPress is the world’s most popular Content Management System (CMS), powering over 40% of all websites globally. Whether you are building a personal blog, business website, portfolio, or a full-scale e-commerce store with WooCommerce, WordPress offers unmatched flexibility, ease of use, and thousands of themes and plugins.
With Aveshost DirectAdmin web hosting, you don’t need to manually create databases, download zip archives, or edit configuration files. The built-in Softaculous 1-Click Auto Installer handles the entire installation process automatically in under 60 seconds.
In this step-by-step guide, we will walk you through how to install WordPress in DirectAdmin using the Softaculous Auto Installer.
Prerequisites
- An active Web Hosting account with DirectAdmin.
- A registered domain name added to your DirectAdmin account (see How to Add a Domain Name in DirectAdmin).
- Your domain pointed to Aveshost nameservers (refer to Where to find Aveshost nameservers).
- An active SSL certificate installed and HTTPS enabled (see How to Install an SSL Certificate in DirectAdmin and How to Force HTTP to HTTPS in DirectAdmin).
- Access to your DirectAdmin control panel (see How to Login to DirectAdmin Control Panel).
Step-by-Step Guide: How to Install WordPress in DirectAdmin
Step 1: Open Softaculous in DirectAdmin
- Log in to your DirectAdmin control panel.
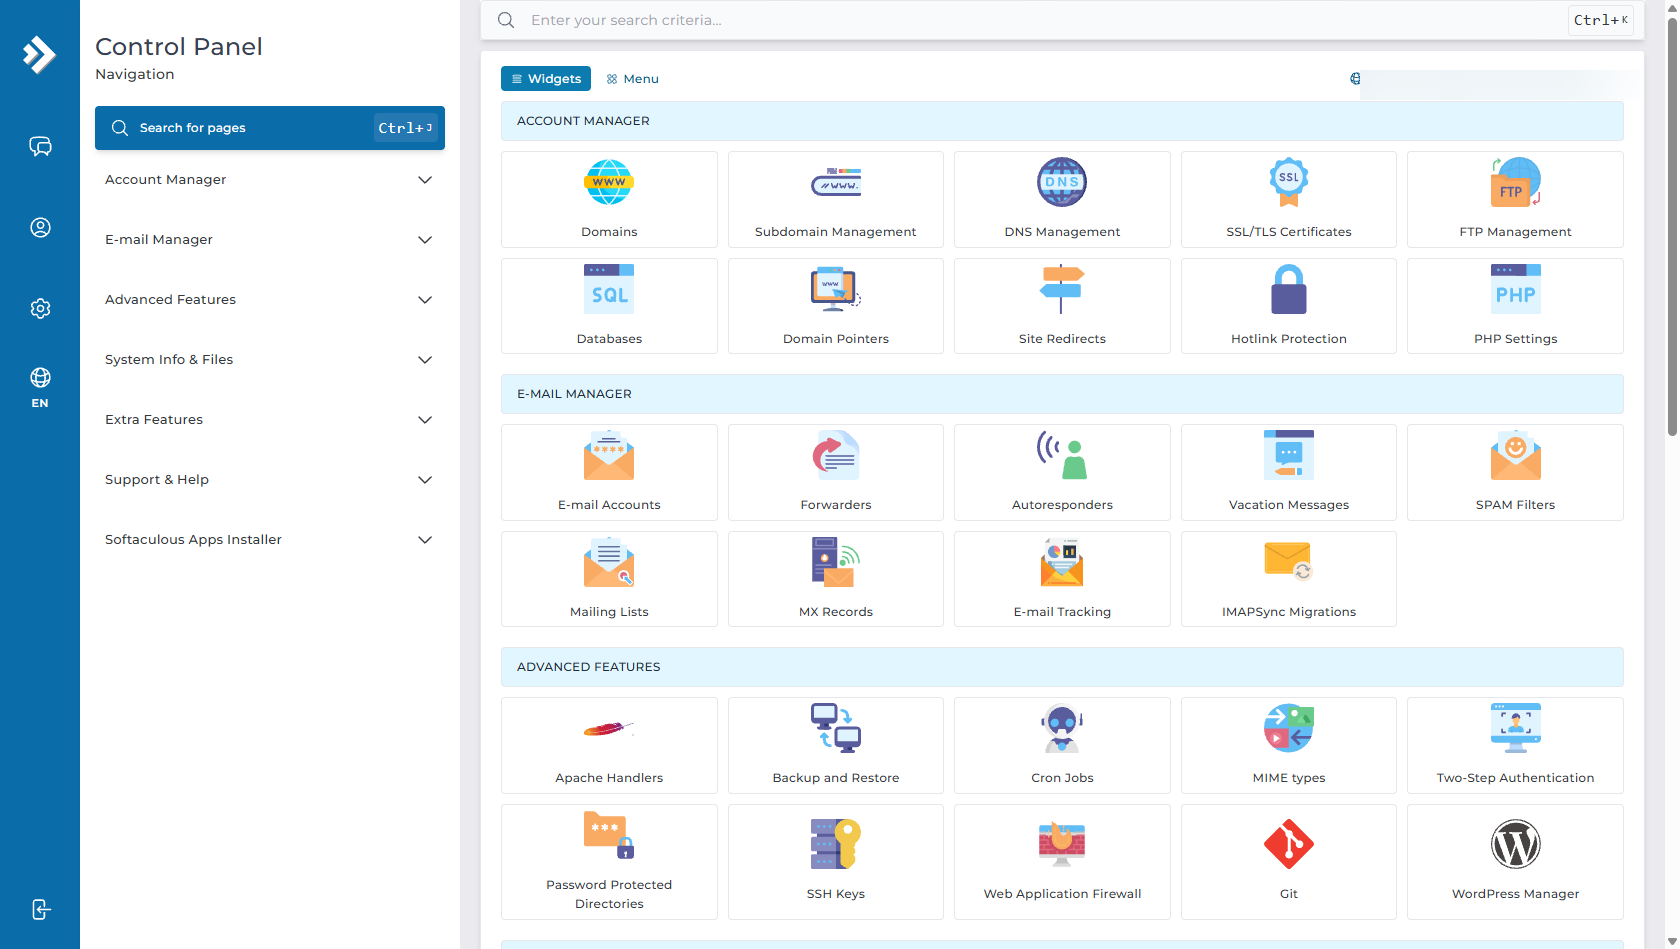
- In the left sidebar or the main dashboard, navigate to Extra Features (or Softaculous Apps Installer).
- Click on Softaculous Auto Installer or select WordPress under the Top Scripts list.
Step 2: Access the WordPress Overview & Click "Install Now"
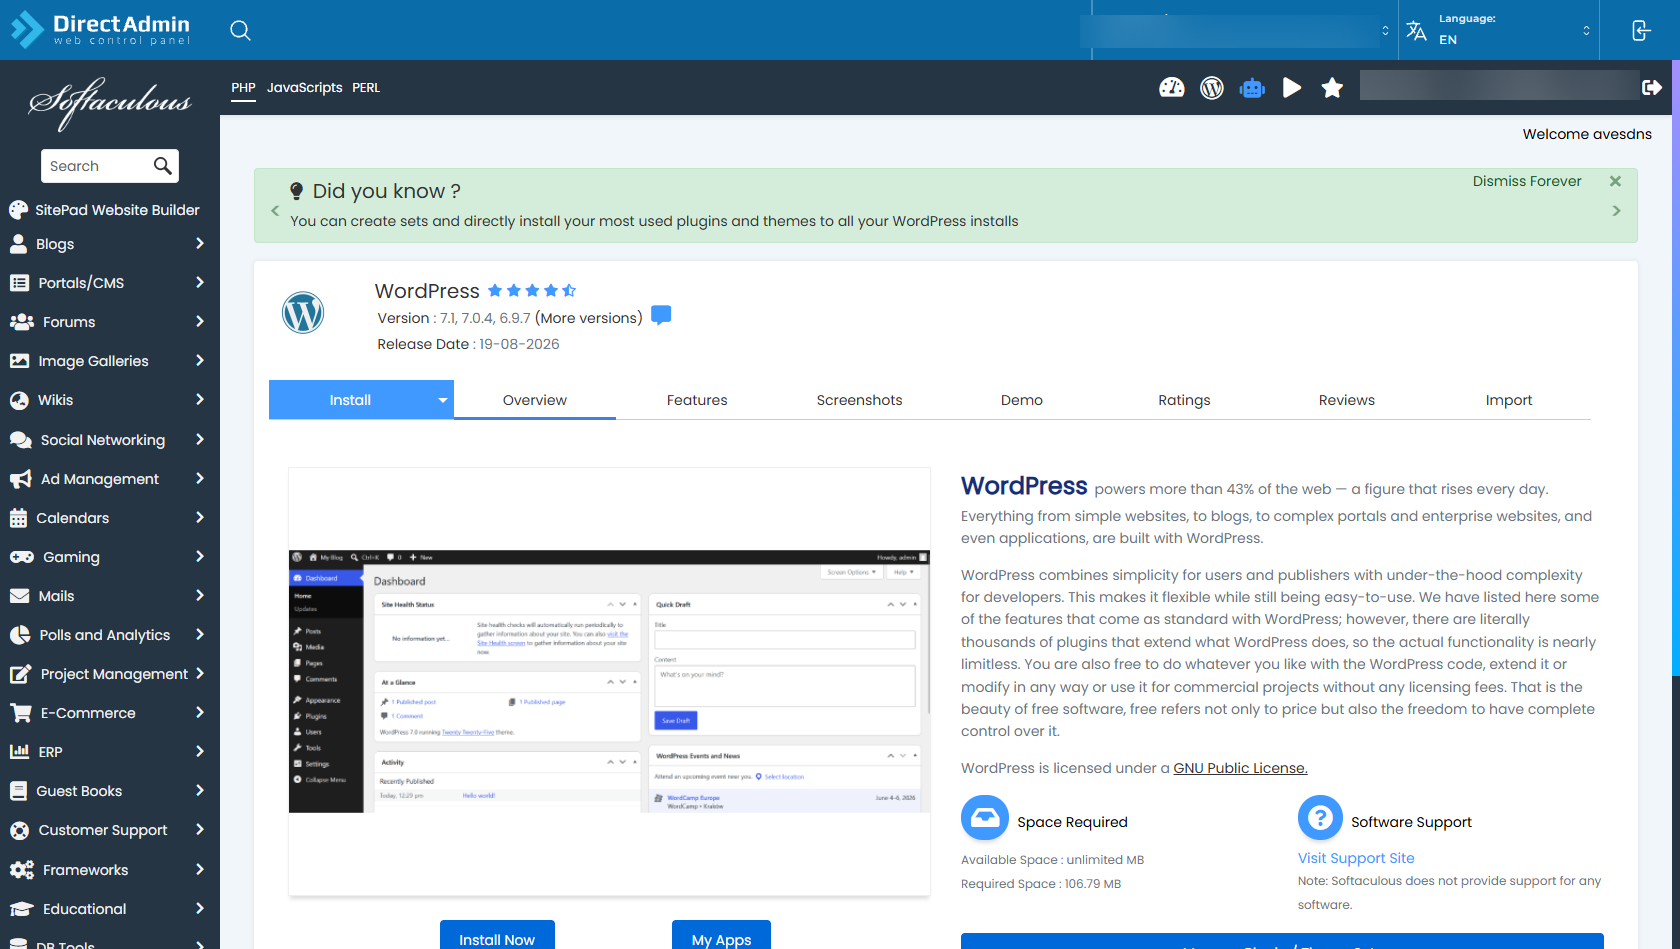
- On the Softaculous WordPress overview page, you will see key information about the current WordPress release, features, ratings, and space requirements.
- Click the bright blue Install Now button to launch the setup wizard.
Step 3: Configure Your Software & Site Settings
Fill out the configuration form with your website preferences:
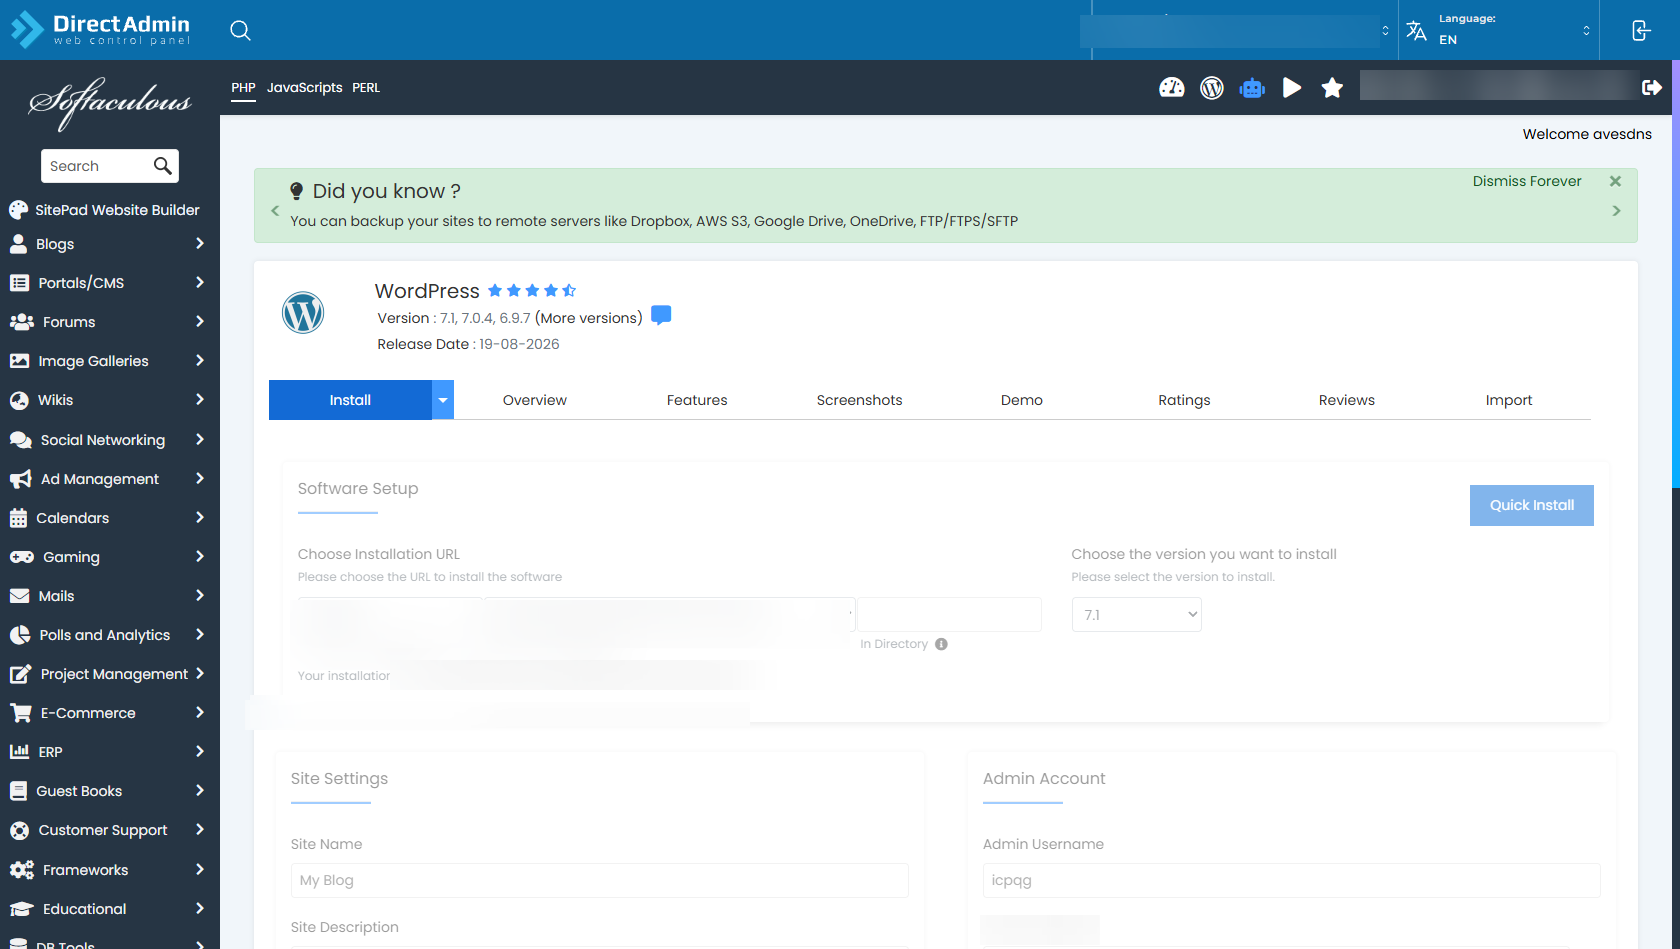
1. Software Setup:
- Choose Protocol: Select
https://(orhttps://www.if your domain uses www). (Make sure you have an SSL certificate installed to avoid browser security warnings). - Choose Domain: Select the domain name on which you want to install WordPress from the dropdown menu.
- In Directory: CRITICAL STEP: If you want WordPress to be accessible directly at your root domain (e.g.,
https://yourdomain.com), leave this field completely empty. Only enter a value (likeblogorshop) if you specifically want WordPress installed in a subfolder (e.g.,https://yourdomain.com/blog). - Choose the version you want to install: Select the latest stable version of WordPress (default is recommended).
2. Site Settings:
- Site Name: Enter the name of your website (e.g., My Business Portal). You can change this later at any time in WordPress.
- Site Description: Enter a brief tagline or description of your site.
- Enable Multisite (WPMU): Leave this unchecked unless you are specifically building a WordPress Multisite network.
3. Admin Account:
- Admin Username: Security Tip: Never use default usernames like
adminoradministrator. Choose a unique, secure username. - Admin Password: Enter a strong password with a mix of uppercase letters, numbers, and symbols, or click the key icon to generate a secure password. Make sure to save this in a secure password manager.
- Admin Email: Enter a valid email address that you actively check. Password reset links, system notifications, and security alerts will be sent here.
4. Choose Language & Plugins:
- Select Language: Choose your preferred language for the WordPress dashboard.
- Select Plugin(s): Optionally check recommended plugins such as Limit Login Attempts (for brute-force protection) or caching tools.
Step 4: Execute the Installation
- Scroll down to the bottom of the installation page.
- (Optional) In the Email installation details to box, enter your email address to receive an installation receipt with your website details.
- Click the Install button.
- Softaculous will now download the WordPress files, configure the MySQL database, set up your admin user, and initialize WordPress. This typically takes between 15 to 30 seconds.
Post-Installation: Accessing Your WordPress Dashboard
Once the installation finishes, Softaculous will present a confirmation message with two primary links:
- Website URL:
https://yourdomain.com(your live public website). - Administrative URL:
https://yourdomain.com/wp-admin/(your WordPress login portal).
Click on the Administrative URL, enter your Admin Username and Admin Password created during setup, and you will be logged into your WordPress admin dashboard!
Recommended First Steps in WordPress:
- Set Permalinks for SEO: In your WordPress dashboard, navigate to Settings > Permalinks, select Post name (
https://yourdomain.com/sample-post/), and click Save Changes. - Install a Theme: Go to Appearance > Themes > Add New to choose from thousands of free WordPress themes or upload a premium theme.
- Install Essential Plugins: Go to Plugins > Add New to install essential tools for SEO (e.g., Rank Math or Yoast), security (e.g., Wordfence), and speed caching (e.g., LiteSpeed Cache).
Frequently Asked Questions & Troubleshooting
Q: Why did Softaculous show an error saying "The directory already exists"?
A: This happens if there are existing files (like default placeholder index.html files) in your domain's public_html folder. Softaculous will display a checkbox saying "Select the checkbox to overwrite all files and continue". Check the box and click Install again, or use DirectAdmin File Manager to delete old placeholder files.
Q: How do I access Softaculous WordPress Manager to create backups, staging, or clones?
A: In DirectAdmin, go to Extra Features > WordPress Manager by Softaculous. Here you can manage automated backups, create staging copies of your site for testing changes, clone installations, and enable auto-updates with a single click.
Q: What should I do if my site says "Not Secure" after installation?
A: Make sure you have installed a free Let's Encrypt SSL certificate and enabled HTTPS redirection. Follow our step-by-step guides on How to Install an SSL Certificate in DirectAdmin and How to Force HTTP to HTTPS in DirectAdmin.
Need Further Assistance?
If you encounter any issues installing WordPress or need help configuring your website, our 24/7 technical support team is always here to assist you. Feel free to submit a support ticket through your client area.
